
For a single event, a ‘photograph-ready’ fit is achieved not by expensive tailoring, but by mastering strategic compromises.
- Prioritize the shoulder fit above all else; it’s the anchor of a sharp silhouette and costly to alter.
- Focus on comfort, especially the waistband, as a fidgety child can’t maintain a polished look.
- Factor in resale value from day one to make buying a high-quality suit more cost-effective than renting.
Recommendation: Buy a suit that fits perfectly in the shoulders off the rack, and invest only in minor, high-impact alterations like hemming the trousers.
The invitation arrives, and with it, the vision: your son, looking impossibly sharp and polished in a suit at a wedding, communion, or formal gathering. The reality, however, quickly sets in. How do you justify the cost and effort of a perfectly fitted suit for an event that lasts only a few hours, especially for a rapidly growing child? Many parents default to buying a size up for longevity or simply renting, often resulting in a look that’s more ‘borrowed’ than ‘bespoke’. This common approach overlooks a crucial fact about formal wear for kids.
The goal isn’t a suit that will last for years; it’s a suit that looks impeccable for the eight hours of the event. This shifts the entire strategy. Instead of focusing on durability or room to grow, we must focus on visual impact and comfort. The secret to achieving that high-end, tailored appearance on a ready-to-wear budget lies in a philosophy of strategic compromise. It’s about knowing which fit points are non-negotiable, which alterations offer the most bang for your buck, and how to make smart choices that balance appearance, comfort, and cost.
This guide moves beyond the generic advice. We will deconstruct the fit of a boy’s suit, piece by piece, to empower you to make expert-level decisions. You will learn why the shoulders are the true foundation of a great fit, how to handle simple but critical alterations yourself, and how to weigh the financial pros and cons of every choice, from the suit itself to the accessories that complete the look. The result is a ‘photo-ready’ ensemble that looks and feels custom-made, all while respecting your budget.
To navigate this process effectively, this guide breaks down the key decisions you’ll face. From foundational fit principles to smart financial strategies, each section provides the precise, budget-aware advice needed to ensure your son looks his absolute best.
Summary: A Menswear Specialist’s Guide to Fitting a Boy’s Suit for a Single Event
- Why Shoulder Fit Matters More Than Sleeve Length for a Sharp Look?
- How to Measure Inseam for Hemming Without a Professional Tailor?
- Vest Only or Full Jacket: What Works Best for Outdoor Summer Events?
- The Rigid Waistband Mistake That Makes Boys Refuse to Sit Down
- When to Visit the Tailor: The Ideal Window Before the Event
- How to Maintain Clothes to Resell Them for 50% of Original Value?
- Renting vs. Buying: Which Makes Sense for a Ring Bearer Outfit?
- Top 5 Accessories That Transform Basic Outfits for Under $50?
Why Shoulder Fit Matters More Than Sleeve Length for a Sharp Look?
In the hierarchy of suit fitting, the shoulders are the absolute monarch. A jacket that fits perfectly across the shoulders creates a strong, clean silhouette that frames the entire body. If the shoulders are too wide, the jacket will droop and create a “shoulder divot”—a hollow spot between the shoulder and arm. If they are too narrow, the fabric will pull and bunch, restricting movement. Unlike sleeve length or trouser hems, which are simple adjustments, altering a jacket’s shoulders is a complex and expensive reconstruction. In fact, professional tailors confirm that significant shoulder work can cost between $75 and $150, often exceeding the value of the jacket itself.
This is the cornerstone of our strategic compromise: never compromise on the shoulder fit. When shopping, ignore sleeve length initially and focus entirely on finding a jacket where the shoulder seam ends exactly where your son’s natural shoulder does. A perfect shoulder fit makes the entire suit look structured and intentional, even if other elements are less than perfect. It’s the single greatest indicator of a high-quality, well-fitting garment. All other adjustments are secondary and far more manageable.
Checklist for a Perfect Shoulder Fit
- Check for the ‘shoulder divot’: A hollow spot between the shoulder and arm indicates oversized shoulder pads. The fabric should lay flat.
- Look for ripple effects: Lumps or wrinkles on the top of the sleeve signal improper shoulder placement or a fit that’s too tight.
- Test the shoulder seam: It must align exactly where the natural shoulder curve meets the arm. Not before, not after.
- Watch for shoulder overhang: If the fabric angles inward down the arm, the jacket is too large, creating a sloppy, droopy effect.
How to Measure Inseam for Hemming Without a Professional Tailor?
Once you’ve secured a jacket with a perfect shoulder fit, the next highest-impact adjustment is the trouser hem. Trousers that are too long will bunch and puddle around the ankles, instantly cheapening the look. Trousers that are too short look like a hand-me-down. Fortunately, this is one of the easiest and most affordable alterations, and you can get the measurement right at home with precision.
The biggest mistake parents make is measuring the inseam with the child barefoot or in socks. The length of the trouser must be determined by the shoes he will wear to the event. Different dress shoes have different heel heights and sole thicknesses, which dramatically affects how the trouser fabric “breaks” or drapes over the shoe. The “Event Shoes On” method is non-negotiable. Have your son put on the exact shoes he’ll be wearing. Measure from the crotch seam down the inside of the leg to the point where you want the hem to fall. For a modern, sharp look, aim for a slight break: the fabric should have a single, gentle fold where it rests on the top of the shoe.
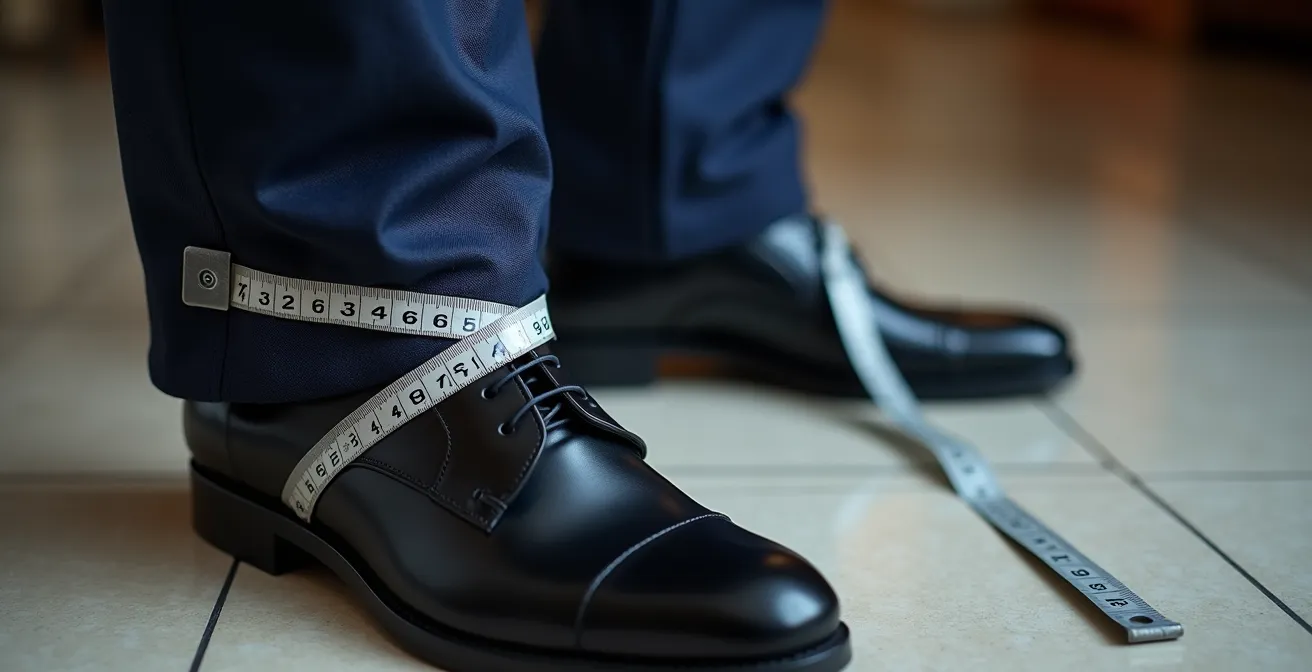
This visual guide shows the correct positioning. The measuring tape should follow the leg down to just past the ankle, accounting for the shoe’s shape. Mark this length with a pin, then have your child walk a few steps to ensure the length is comfortable and doesn’t ride up too high when he moves. This simple, precise measurement is all a tailor needs to execute a perfect hem.
Vest Only or Full Jacket: What Works Best for Outdoor Summer Events?
The context of the event dictates the next strategic choice, especially for warm-weather or outdoor occasions. While a full jacket is the traditional choice for maximum formality, it can be a recipe for a miserable, overheated child. For summer weddings or daytime events, the “vest only” look is a stylish and far more practical alternative. It maintains a level of formality and structure while allowing for significantly better airflow and freedom of movement for arms, which is crucial for an active child.
As the experts at the TieMart Wedding Guide note, this approach allows a young attendant to look sharp without being a miniature version of the adults. They state:
Boys’ suspenders with a bow tie or a vest and dress shirt can complement without copying. This look is especially popular for outdoor weddings today, keeping the little guy comfortable and stylish.
– TieMart Wedding Guide, How to Dress Your Ring Bearer
This choice is not just about comfort; it’s also a smart budget decision. A high-quality vest is significantly less expensive than a full suit jacket, and it offers more versatility for future use. The key is to ensure the vest fits well—snug but not tight—and is paired with a crisp, well-fitting dress shirt.
| Factor | Vest Only | Full Jacket |
|---|---|---|
| Comfort in Heat | Excellent – allows airflow | Poor – traps heat |
| Formal Look | Semi-formal, rustic weddings | Traditional formal |
| Cost | $50-100 for quality vest | $150-300 for full suit |
| Versatility | Can pair with different trousers | Complete matching set |
| Movement Freedom | Unrestricted arms | Can restrict play |
The Rigid Waistband Mistake That Makes Boys Refuse to Sit Down
A perfectly tailored suit is worthless if the child wearing it is miserable. The most common culprit of discomfort in boys’ formal wear is a rigid, unforgiving waistband. Adult suit trousers are designed for minimal movement, but a child will be sitting, standing, running, and crouching. A stiff waistband digs into their stomach, especially when seated, leading to fidgeting, complaining, and the dreaded refusal to sit down or wear the outfit at all. This is where the comfort factor becomes paramount to the success of the look.
When shopping, prioritize trousers with a built-in comfort mechanism. For younger boys (typically sizes 2-7), an elastic waistband is ideal. For older boys (sizes 8-20), look for an expandable or adjustable waistband, which offers flexibility with a more grown-up appearance. To test the fit, use the “Two-Finger Test”: while your son is seated, you should be able to comfortably slide two fingers between his waist and the waistband. If you can’t, it’s too tight. Also, inspect the inner waistband for any rough stitching or irritating tags that could cause chafing over a long day.
Case Study: Perfect Tux’s Graduated Comfort Approach
The brand Perfect Tux exemplifies this strategy. They design their boys’ formal trousers with full elastic waistbands for toddler sizes (2-7) to maximize flexibility. For older boys (sizes 8-20), they transition to expandable waistbands that provide a few inches of give without sacrificing a classic flat-front look. This graduated approach acknowledges that comfort needs change with age, ensuring all-day wearability and preventing the fidgeting and discomfort associated with rigid, adult-style trousers.
When to Visit the Tailor: The Ideal Window Before the Event
With your strategically chosen suit in hand, timing your visit to the tailor is the final logistical hurdle. Go too early, and a sudden growth spurt could render the alterations useless. Go too late, and you risk rush fees or the tailor being fully booked. The ideal window to take the suit for alterations is two to three weeks before the event. This buffer is long enough for the tailor to complete the work without pressure but short enough to minimize the risk of your child outgrowing the fit.
When you go, be prepared. Bring your son, the full suit, the dress shirt, and, most importantly, the exact shoes he will wear. Communicate clearly that this is for a one-time event. A good tailor will understand the ‘strategic compromise’ philosophy and focus on high-impact, low-cost adjustments. The primary targets should be the trouser hem and possibly the sleeve length (if they are more than an inch too long). Based on average alteration prices, you can expect these basic jobs to be highly affordable, often costing in the range of $20 to $50 for hemming and sleeve adjustments. This is a small, worthwhile investment for a huge visual return.
Choosing a professional ensures the work is done cleanly and correctly. When you pick up the altered suit, have your son try it on one last time in the shop to ensure everything is perfect. Then, take it home and keep it safely stored until the big day.
How to Maintain Clothes to Resell Them for 50% of Original Value?
The smartest way to manage the cost of a one-time-wear suit is to treat it as a temporary asset, not a permanent wardrobe addition. By planning for resale from the moment you purchase, you can often recoup 40-60% of the original cost, making buying a high-quality suit significantly cheaper than renting. This requires a proactive, meticulous approach both before and during the event. The key is to preserve its “like new” condition and document it.
Create what we’ll call a “Resale Kit.” This starts at the point of sale. Follow these steps to maximize your return:
- Preserve All Packaging: Immediately after purchase, place the original tags, receipt, and any spare buttons in a sealed ziplock bag. This is proof of authenticity and quality.
- Take “Before” Photos: Before the event, take several high-quality photos of the pristine suit on a hanger, from multiple angles, in good light. These will be your primary listing photos.
- Pack for Damage Control: Include a stain-remover pen in your event bag for immediate spot treatment of any spills. A small stain addressed in seconds is far better than one that sets.
- Use a “Reception Shirt”: For long events with a meal, pack a comfortable, secondary shirt for your son to change into after the formal photos are done. This protects the expensive dress shirt from food stains.
- Document the Wear: Keep track of the event to honestly state “worn once for 3 hours” in your resale listing. This specificity builds trust with buyers.
- Get It Professionally Cleaned: After the event, have the suit professionally cleaned and keep the receipt. Including a photo of the cleaning receipt with the resale listing proves it’s ready-to-wear for the next owner.
This level of preparation might seem excessive, but it’s what separates a successful, high-value resale from a lowball offer. As one parent shared from their experience:
I bought grey uniform pants for only $7.50 at Walmart for my ring bearer son. After keeping them pristine during the wedding with our damage control plan, I resold the complete outfit on a local Facebook group for 60% of what I paid. The key was having those before photos and keeping all original packaging.
– Anonymous Parent
Key Takeaways
- The fit across the shoulders is the non-negotiable anchor of a boy’s suit; it must be perfect off the rack.
- Prioritize comfort, especially flexible waistbands, to ensure the child remains happy and the look stays polished throughout the event.
- Buying can be more cost-effective than renting if you plan for resale from day one, preserving the suit’s condition and documentation.
Renting vs. Buying: Which Makes Sense for a Ring Bearer Outfit?
The classic dilemma for a one-time event outfit is whether to rent or buy. Renting seems like the obvious budget-friendly choice, but a closer look at the numbers, factoring in our strategic compromises, often tells a different story. A rental fee may seem low, but it’s a 100% sunk cost. You also have to add a non-refundable damage waiver, and you’re limited to the sizes and styles available, with no option for custom tailoring beyond what the rental company offers.
Buying, on the other hand, gives you complete control. You can shop for the perfect style, prioritize the fit points that matter (like shoulders), and have it altered for a truly custom look. While the initial sticker price is higher, the true cost of ownership is the purchase price minus the resale value. As we’ve established, you can realistically expect to recoup 40-60% of the price if you maintain the garment well. This “effective cost” can often be equal to or even less than a rental fee, especially for higher-quality suits. For example, a purchased outfit from a boutique like Sara’s Children’s Boutique might cost $180, but with a 50% resale recovery, the effective cost is $90—directly comparable to a high-end rental.
The following table breaks down the financial and practical trade-offs to help you make an informed decision based on your specific needs and budget.
This direct comparison, detailed in a recent analysis from D’Ann & Co. Bridal, shows the clear trade-offs.
| Factor | Renting | Buying |
|---|---|---|
| Initial Cost | $50-80 rental fee | $100-300 purchase price |
| Damage Waiver | $15-25 non-refundable | N/A |
| Customization | Limited to available sizes | Can tailor to perfect fit |
| Resale Recovery | 0% (no ownership) | 40-60% typical resale |
| Size Flexibility | Must fit rental sizes | Can alter for growth spurts |
Top 5 Accessories That Transform Basic Outfits for Under $50?
Once you have a well-fitting but basic suit, accessories are the secret weapon to elevate the entire look from “nice” to “unforgettable.” They inject personality, add polish, and create a cohesive, high-end feel for a very small investment. You don’t need to spend a fortune; a few strategic choices can completely transform the outfit. The goal is to add layers of texture, color, and personal flair that draw the eye and complete the story.
Focus on a few key pieces that offer the most visual impact. A quality bow tie in a rich fabric like velvet or silk, for instance, adds a touch of luxury that a standard shiny polyester version cannot. Suspenders not only look sharp but also serve a practical purpose by holding up trousers without a tight belt. Even something as simple as a pair of fun, patterned socks can add a delightful, unexpected pop of personality when your son sits down. The key is to choose accessories that are well-made and proportionate to a child’s frame.
Here are five transformative accessories that can be sourced for well under a total of $50, proving that the final polish doesn’t have to be expensive:
- Personality Socks ($10-15): Fun patterns like dinosaurs or superheroes that peek out when sitting add a touch of whimsy and make the outfit feel less stuffy.
- Velvet or Silk Bow Tie ($15-20): The texture adds a layer of visual luxury that instantly elevates a basic cotton shirt.
- Quality Suspenders ($15-25): Look for kids’ sizes in classic materials like elastic webbing or leather that can match the adult wedding party for a coordinated look.
- Pocket Square ($8-12): A small silk or linen pocket square, properly folded, adds a dash of sartorial polish. Ensure it’s sized for a child’s smaller pocket.
- Comfortable Dress Shoes ($25-40): A dark, leather-look sneaker or a soft loafer provides the formal appearance without the pain and meltdowns of stiff, traditional dress shoes.
These small details work together to create a look that feels thoughtful and custom-curated, completing the mission of achieving a bespoke look on a budget.
By focusing on these strategic fit points and smart financial choices, you can confidently assemble an outfit that ensures your son looks and feels his best, creating picture-perfect memories without breaking the bank. The next step is to start shopping with this new, expert-level checklist in mind.