In summary:
- Shift focus from simple organization to creating an “independent workflow” where children can select, use, and clean up supplies on their own.
- Use clear containers and curated, low-clutter shelves to provide visual cues that foster independence and concentration.
- Systematically teach cleanup as a practical life skill, like the two-jar method for washing brushes, to integrate it into the creative process.
- Rotate a limited selection of age-appropriate, low-mess supplies to maintain engagement without overwhelming the child or the space.
- Prioritize proper ergonomics with child-sized furniture to support focus and healthy physical development during creative activities.
The image of a child joyfully splattering paint is a parenting ideal. The reality, however, often involves marker stains on the wall, a floor littered with paper scraps, and a sink full of glue-caked brushes. Many parents, exhausted by the constant chaos and cleanup, find themselves limiting creative time. The common advice is to buy more bins, a rolling cart, and to label everything. But this only addresses the storage of supplies, not the flow of their use. It attempts to contain the mess rather than prevent it.
The true key to a successful, low-mess craft station isn’t about having the most organized shelves. It’s about designing a prepared environment that fosters an independent workflow for your child. The goal is to move beyond simply providing materials and instead build a system where the entire creative cycle—from inspiration and material selection to use and cleanup—is a seamless, self-guided loop. This approach doesn’t just minimize mess; it transforms a potentially chaotic activity into a profound opportunity for learning responsibility, problem-solving, and practical life skills.
This guide will walk you through setting up this system. We will explore how to select the right containers and supplies, teach essential cleanup skills, optimize the physical space for focus, and manage the supply rotation to keep creativity flowing. By focusing on the child’s process, you can build a craft station that truly serves them while bringing peace and order back to your home.
Summary: A Montessori-Inspired Craft Station System
- Why Clear Containers Boost Creativity More Than Opaque Bins?
- Washable vs. Permanent Markers: Which Brands Actually Wash Off Walls?
- How to Teach a 3-Year-Old to Clean Brushes Without Water Damage?
- The Table Height Mistake That Causes Posture Issues During Drawing
- When to Rotate Art Supplies: The 2-Week Rule for Engagement
- Why Cluttered Shelves Hinder Concentration in 4-Year-Olds?
- How to Use Color-Coded Zones to Guarantee Every Child Gets 5 Eggs?
- How to Turn Daily Play Into Learning Without Pressure?
Why Clear Containers Boost Creativity More Than Opaque Bins?
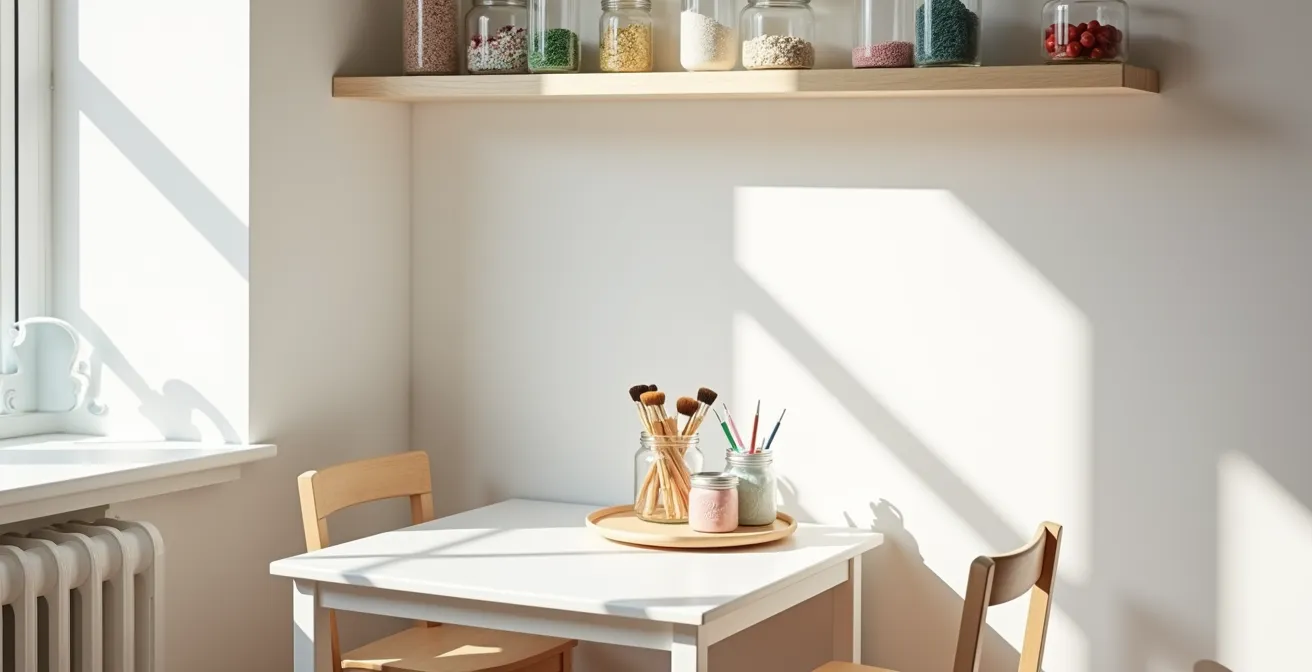
The first step in building an independent workflow is ensuring your child can see their options. Opaque bins with labels are an adult-centric organization system. For a young child who is still developing literacy, they are mystery boxes that require parental help to open. This immediately breaks the cycle of independence. Clear containers, on the other hand, provide powerful visual scaffolding. The child can see the colorful pom-poms, the textured pipe cleaners, and the different types of paper, allowing their brain to make creative connections without needing to ask, “What’s in here?”
This concept of visual accessibility is a cornerstone of the Montessori method. When a child can survey all their tools, they can plan their project and gather materials independently. This ownership over the initial phase of creation is deeply empowering. It tells the child, “This is your space, and you are capable of bringing your ideas to life.” The resulting explosion in creativity is not just about the art itself but about the confidence gained through self-directed action.
Case Study: The “Creation Station” Transformation
In a project inspired by the book Tinkerlab, a family converted a standard craft corner into a self-serve “Creation Station.” By making age-appropriate supplies readily available in clear, accessible containers, they observed that their children’s “imagination and creations exploded even more.” The ability for the children to independently access materials whenever inspiration struck was the key factor in this creative surge, proving that true accessibility trumps picturesque organization.
By removing the barrier of hidden supplies, you remove a major source of friction in the creative process. The child spends less time asking for help and more time doing, thinking, and inventing. The container becomes less about storage and more about invitation, silently encouraging the child to explore the possibilities within.
Washable vs. Permanent Markers: Which Brands Actually Wash Off Walls?
A parent’s fear of mess is a major inhibitor of creativity. If you are constantly worried about stained clothes, furniture, or walls, you will subconsciously hover and restrict your child’s freedom to explore. The solution is not to ban messy materials but to be strategic in your choices. Selecting age-appropriate, low-mess supplies is fundamental to creating a relaxed and trusting creative environment. This means prioritizing washable options for markers, paints, and glues, especially for younger children.
While the question often focuses on which brands wash off walls best, the more effective approach is to match the tool to the child’s developmental stage. For toddlers, who are still developing fine motor control and an understanding of boundaries, a permanent marker is a disaster waiting to happen. A chunky, twistable crayon is a far more suitable tool. As the child grows, you can gradually introduce materials that require more responsibility, like washable markers and then water-based paints.
This thoughtful selection process is part of designing the prepared environment. It sets the child up for success by minimizing the potential for accidents that cause frustration for both parent and child. When you trust the materials, you can trust your child more, allowing for the independent, pressure-free exploration that is so vital for learning.
| Age Group | Recommended Product | Key Features |
|---|---|---|
| Toddlers (2-3) | Twistable Crayons | Don’t break, easy grip for little hands |
| Preschool (3-5) | Washable Stamps & Markers | Easy cleanup, safe for unsupervised use |
| School Age (6+) | Storage boxes with lids | Promotes organization, clean look |
How to Teach a 3-Year-Old to Clean Brushes Without Water Damage?
The cleanup phase is where most craft station systems break down. For many parents, it’s a dreaded chore that happens long after the creative spark has faded. The Montessori approach reframes this entirely: cleanup is not the end of the activity, but an integral part of it. It’s a practical life skill that is just as important as learning to hold a paintbrush. For a young child, the process of washing, drying, and putting away materials provides a satisfying sense of completion and reinforces their feeling of capability.
The key is to teach a specific, manageable method. For paintbrushes, the two-jar system is brilliant in its simplicity. You provide two small jars of water: one for the “dirty rinse” and one for the “clean rinse.” The child first swishes the brush in the dirty jar to remove most of the paint, then in the clean jar to finish the job. A small sponge or cloth nearby allows them to gently squeeze out the excess water. This breaks down a complex task into clear, achievable steps.
This paragraph introduces the concept of the two-jar brush cleaning method. For a child, seeing the process makes it much easier to understand and replicate. The illustration below visualizes this simple yet effective Montessori technique.
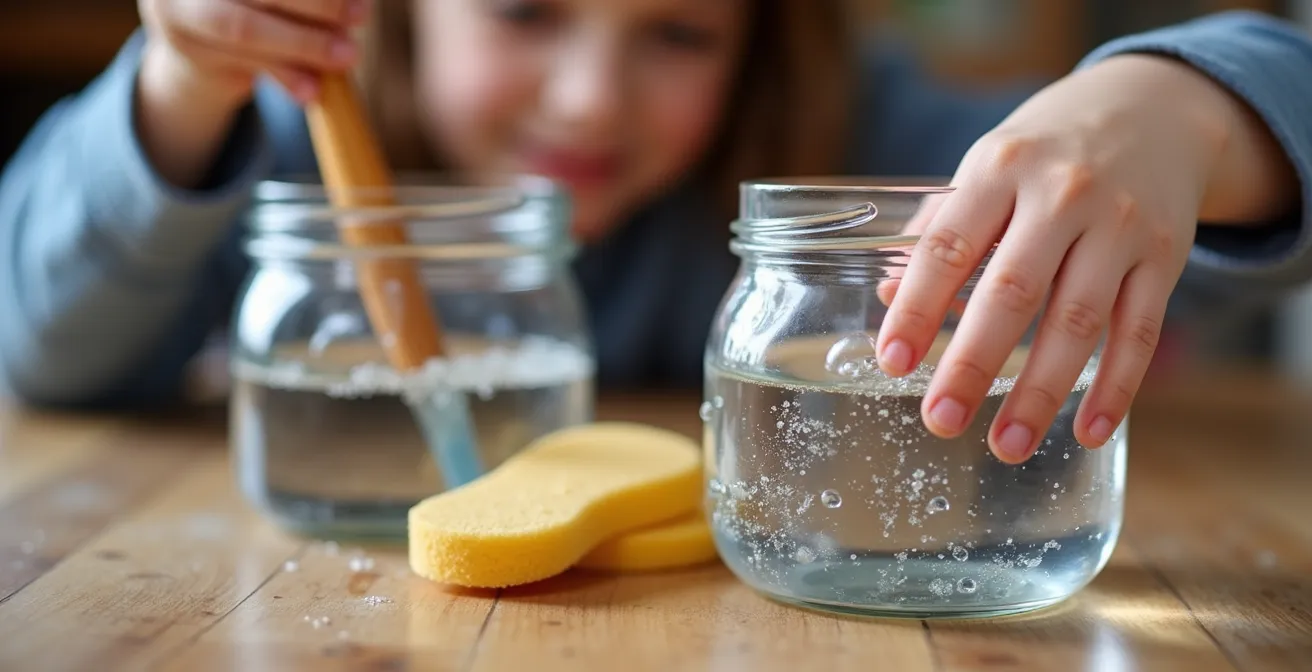
As you can see, the process is contained and logical. By teaching this method, you are not just preventing water damage or messy sinks; you are instilling a sense of order and responsibility. You are showing your child that they are in control of their entire workflow, from the first stroke of paint to the final, clean brush being put back in its place.
The Table Height Mistake That Causes Posture Issues During Drawing
An often-overlooked aspect of the prepared environment is ergonomics. We might spend hours choosing the right art supplies but give little thought to the table and chair where the creation happens. If a child is sitting at an adult-sized dining table, with their feet dangling and their arms hunched up, they will be physically uncomfortable. This discomfort leads to fidgeting, a shortened attention span, and poor posture that can have long-term effects. A child who is comfortable can focus for longer, allowing for deeper engagement in their work.
The ideal setup allows the child to sit with their feet flat on the floor (or a footrest) and their elbows bent at a 90-degree angle when their forearms are resting on the table. This stable and supported posture frees up their cognitive resources to focus on the task at hand, rather than on trying to keep their body stable. This connection between physical stability and mental focus is significant; indeed, research on creativity in early childhood shows that children engaging in play-based learning demonstrate higher cognitive growth and stronger memory retention.
This paragraph explains the importance of correct ergonomic posture for a child’s concentration and comfort during creative activities. The illustration below provides a clear visual reference for the ideal 90-degree angles at the knees and elbows.
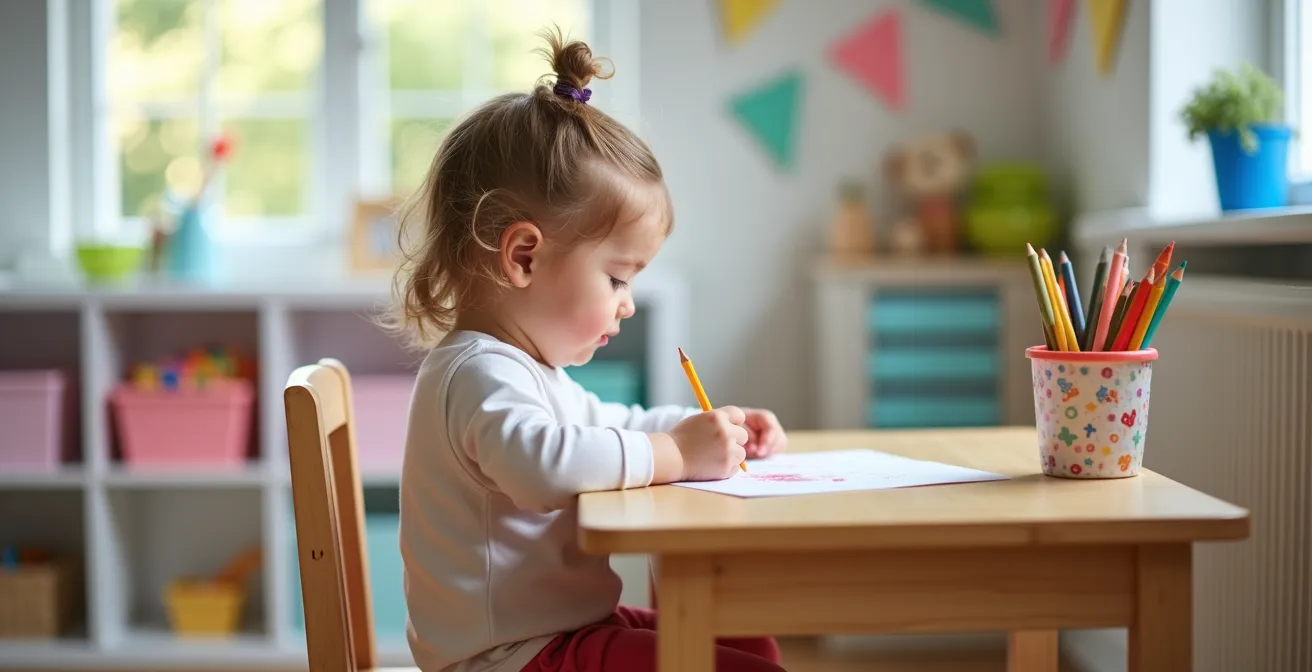
Investing in a child-sized table and chair is an investment in their ability to concentrate. It shows respect for them as a worker and acknowledges that their physical comfort is a prerequisite for deep, meaningful play. This proper setup is a silent partner in their creative process, supporting them as they draw, build, and learn.
When to Rotate Art Supplies: The 2-Week Rule for Engagement
Even the most exciting craft station can lose its appeal over time. When a child sees the same materials in the same place every day, they can develop “material blindness.” The novelty wears off, and the invitation to create fades. The solution is not to continuously buy new supplies, but to implement a thoughtful rotation system. This is the principle of “less is more” applied over time. By limiting the available supplies and swapping them out periodically, you can reignite curiosity and keep the station feeling fresh and exciting.
While some suggest a monthly or bimonthly rotation, a “2-week rule” can be a highly effective starting point for younger children whose interests change rapidly. The key is observation. If you notice a certain material hasn’t been touched for a week or two, it’s a candidate for rotation. Swap the neglected basket of feathers for a container of interesting beads or introduce a new type of paper. This curated novelty makes the child feel like they are discovering something new, which is a powerful catalyst for creativity.
Case Study: The “Back Pantry” System
One family implemented a ‘back pantry’ system, storing a portion of their art supplies out of sight. By rotating these items into the main craft station every month or two, they found it created immense excitement and allowed the space to feel fresh. This system was particularly effective after birthdays or holidays, as it prevented the overwhelming influx of new gifts. The parent noted that having less choice at any given time actually highlighted the thoughtfully chosen items, leading to deeper engagement and longer attention spans.
This system also has the practical benefit of making the craft station easier to manage. With fewer items out, there is less to tidy up. The rotation itself becomes a small event, a chance to talk with your child about what they might like to work with next. It respects the natural ebb and flow of a child’s interests while maintaining a sense of order and novelty.
Why Cluttered Shelves Hinder Concentration in 4-Year-Olds?
In our enthusiasm to provide a rich creative environment, it’s easy to fall into the trap of “more is better.” We fill shelves with every color of paper, dozens of marker options, and multiple types of clay. The result, however, is often the opposite of what we intend. A cluttered, overstuffed shelf creates visual noise that can be overwhelming for a young child’s developing brain. Instead of feeling inspired by the abundance of choice, they can experience decision paralysis and find it difficult to focus on a single task.
A child’s executive function skills—the mental processes that enable us to plan, focus attention, and juggle multiple tasks—are still under construction. Too many options tax these skills, making it hard for a child to select a material and see a project through. This isn’t just theory; professional organizers have observed that children start ignoring supplies when there are too many options, even during periods of unlimited time. A curated, minimalist approach is far more effective. A shelf with a few, well-chosen, and neatly arranged options is calming and inviting. It allows the child to clearly see their choices, make a decision, and focus their energy on creating.
Case Study: From 20 Cubbies to Minimalist Success
A family embracing the KonMari method decluttered their child’s room, removing three large shelving units that held 20 cubbies. While they kept the majority of the art supplies—which “sparked joy”—they organized them in a much more minimal way. By drastically reducing the visual clutter of the storage furniture itself and curating what was visible, they found the system worked much better. This demonstrated that even a large quantity of beloved supplies can be managed effectively by limiting how much is displayed at once.
Decluttering your craft station isn’t about deprivation; it’s about clarity. By removing the excess, you make the remaining items more visible, more special, and more likely to be used. You create a space of calm and focus, which is the ideal soil for creativity to grow.
How to Use Color-Coded Zones to Guarantee Every Child Gets 5 Eggs?
While the principle of ensuring fairness might be most visible during an Easter egg hunt—making sure every child gets their five eggs—the same concept is crucial for harmony in a shared craft station. When multiple children are working in the same space, conflicts over supplies are almost inevitable. “She’s using all the blue markers!” or “He won’t share the scissors!” are common refrains. An effective system anticipates these issues by creating clear boundaries and promoting a sense of ownership, and color-coded zones are a simple, visual way to achieve this.
The idea is to assign each child a color. This color can be applied to their personal supply bins, their water cup for painting, or even a designated spot at the table. This system doesn’t mean all supplies are duplicated; communal items like paper and glue can remain in a central location. But for high-demand, personal items like markers, crayons, and scissors, having a personal, color-coded caddy can drastically reduce disputes. It gives each child a secure “home base” for their tools, which they are responsible for using and returning.
This approach moves beyond simply telling children to “share.” It provides a concrete structure that makes sharing easier and less fraught with conflict. The table below outlines a few different systems you can adapt for your family’s specific needs.
| System Type | Best For | Implementation |
|---|---|---|
| Clear containers only | Single child or mature siblings | No labels needed – visibility is key |
| Color-coded zones | Multiple young children | Assign each child a color for their supplies |
| Labeled drawers | Mixed age groups | Simple labels help kids find and return items |
Action Plan: Setting Up a Fair Share System
- Create Stations: Design separate “workstations” for each child, even if it’s just a designated placemat, to provide personal space and minimize accidental jostling.
- Centralize Supplies: Place shared supply drawers or caddies in a neutral zone, ideally between the workstations, to prevent one child from blocking access.
- Label Clearly: Use simple, clear labels (pictures for pre-readers) on containers, even clear ones. Children often rely on the label as the primary identifier.
- Provide Personal Tools: Ensure each station has its own dedicated trash can for scraps and its own basic tool kit (e.g., scissors, glue stick) to reduce the need for constant negotiation.
- Define Cleanup Roles: Assign specific cleanup tasks for the shared space (e.g., one child wipes the table, the other sweeps up scraps) to make tidying up a team effort.
Key takeaways
- The goal of a self-serve craft station is not just organization, but fostering an independent workflow for the child.
- Visual clarity is paramount: use clear containers and uncluttered shelves to reduce cognitive load and inspire creativity.
- Cleanup is a teachable skill, not a chore. Integrating simple routines like the two-jar method empowers children and reduces parental workload.
How to Turn Daily Play Into Learning Without Pressure?
Once you have established a prepared environment—a space that is orderly, accessible, and empowering—a beautiful thing happens: learning occurs naturally, without pressure or formal instruction. A well-designed craft station becomes a laboratory for development. When a child decides to cut a circle, they are practicing fine motor skills. When they mix blue and yellow paint to make green, they are conducting a science experiment. This focus on process over product is the heart of turning play into learning.
Your role as the parent-guide shifts from being an instructor to being an interested observer and thoughtful facilitator. Instead of asking, “What are you making?”—a question that pressures the child to have a final product in mind—you can use process-focused language. Comment on what you see: “I see you are using a lot of blue today,” or “You are making very long lines with that crayon.” This validates their exploration without judgment. Furthermore, neuroscience research confirms that creative activities enhance cognitive flexibility, problem-solving skills, and emotional intelligence, proving that this type of play is serious brain-building work.
Checklist: Using Process-Focused Language
- Observe, Don’t Ask: Instead of “What is it?”, try “You’re working so hard on that.” or “I see you’re using circular motions.”
- Focus on Action: Comment on the child’s actions. “You are carefully placing each sticker.” or “Look how you’re spreading the glue all over the paper.”
- Acknowledge Choices: Point out the decisions they are making. “You chose a lot of different colors for your drawing.” or “I notice you decided to use the big brush.”
- Ask Open-Ended Questions: If you do ask a question, make it about the experience. “How does that paint feel?” or “Tell me about what you’re doing here.”
- Value the Effort: Praise the process, not just the outcome. “You spent a lot of time working on that piece.” is more valuable than “That’s a pretty picture.”
By adopting this mindset, you help your child develop a healthy relationship with creativity, one where experimentation is encouraged and “mistakes” are simply discoveries. The craft station becomes more than a place to make things; it becomes a safe space to think, explore, and grow.
By implementing these principles, you are doing more than just organizing art supplies. You are architecting an environment that cultivates independence, responsibility, and a lifelong love of learning. Start with one small change today—perhaps introducing clear containers or teaching the two-jar method—and watch as your child rises to the occasion, taking ownership of their creative world.
Frequently Asked Questions About Self-Serve Craft Stations
How do you get kids to clean up art supplies?
The key is to treat cleanup as a teachable part of the activity, not an afterthought. Integrate simple, specific routines like the “two-jar method” for brushes. Make sure cleaning supplies are accessible and that the storage system is easy for a child to use (e.g., open bins they can toss things into). Frame it as “caring for our tools” to give the task purpose.
What should be in a toddler art station?
For toddlers (ages 2-3), focus on safe, low-mess, and frustration-free materials that build motor skills. Excellent choices include chunky, twistable crayons that don’t break, washable dot markers, large sheets of paper, stickers, and simple water-based paints with thick brushes. Avoid small items that could be choking hazards and permanent materials.
How do you encourage creativity when a child says “I don’t know what to make”?
This is a perfect opportunity to focus on process over product. Instead of suggesting an outcome (“Why don’t you draw a house?”), offer an invitation to explore the materials. Say something like, “Let’s see what happens when we mix these two colors,” or “I wonder how this textured paper feels to draw on.” Rotating supplies to introduce something novel can also spark new interest.