Building a thrilling backyard for your kids isn’t about expensive plastic slides and swing sets; it’s about intentional landscape design.
- True adventure and development come from a ‘natural playscape’ designed with low-cost materials like dirt, logs, and native plants.
- This approach fosters resilience and creativity by encouraging managed, developmental risk-taking in a controlled environment.
Recommendation: The goal is to stop eliminating all risks and instead learn to remove hidden hazards, allowing your child to safely explore, test their limits, and master their environment.
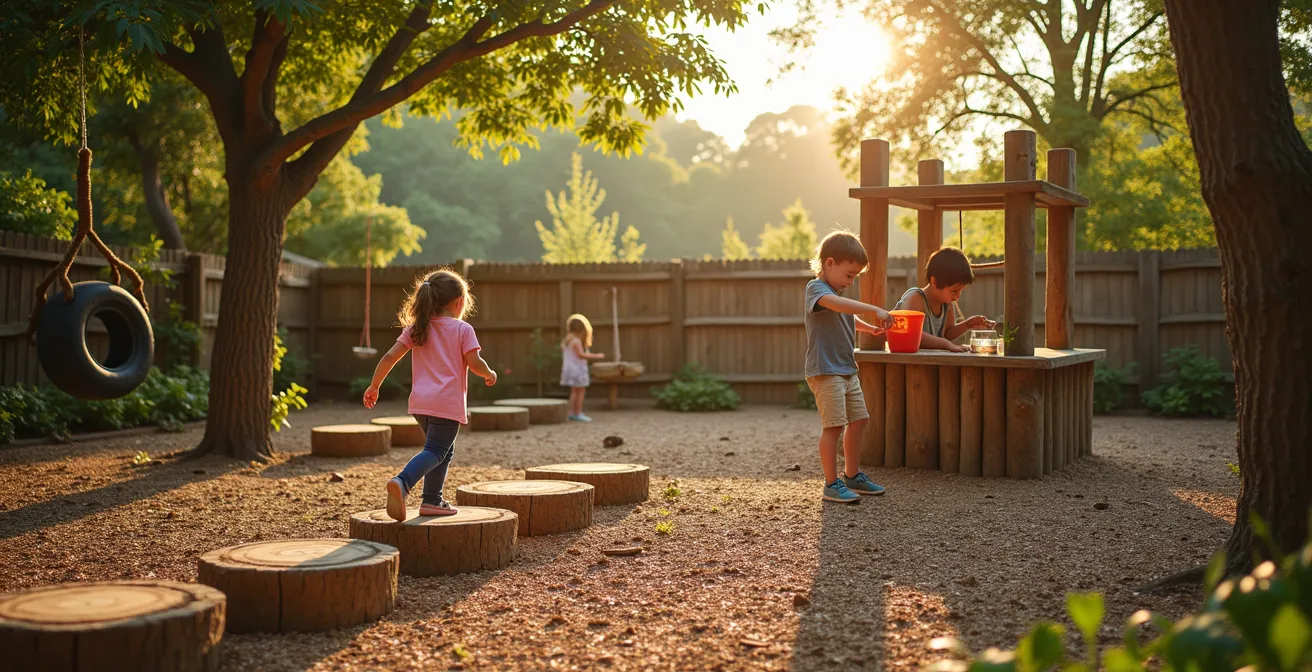
As parents, we’re driven by a desire to see our children explore, grow, and challenge themselves. We see the catalogues filled with brightly colored plastic playgrounds and complex swing sets, and we assume that’s the path to a fun backyard. The common advice is to buy pre-made equipment or follow simple DIY tutorials for a tire swing or a painted-rock tic-tac-toe board. But these solutions often miss the point. They offer fleeting entertainment rather than deep, developmental engagement.
What if the key to a truly magnetic and beneficial play space wasn’t in a box from a big-box store? What if it was already in your yard, waiting to be uncovered? The real secret lies in shifting your perspective from a ‘playground builder’ to a ‘children’s landscape architect’. This approach isn’t about assembling plastic; it’s about designing with nature. It’s about understanding the crucial difference between a hidden hazard (something dangerous the child can’t see, like a rusty nail) and a developmental risk (a visible challenge the child can choose to tackle, like a wobbly log). By removing the former, we create a safe space to embrace the latter.
This guide will walk you through the principles of designing a natural playscape. We will explore how to use dirt, wood, and plants not as decorations, but as tools for building your child’s physical confidence, scientific curiosity, and emotional resilience. Forget the instruction manuals and get ready to see your backyard as a living blueprint for adventure.
In this article, you will discover how to design specific zones that serve a developmental purpose, from microbiome-boosting mud kitchens to proprioception-honing log courses. Follow along to transform your yard into a sanctuary for authentic play.
Summary: How to Build a Backyard Adventure Zone on a Budget?
- Mud Kitchens: Why Dirt Play Is Good for the Microbiome?
- Logs and Stumps: How to Create Natural Climbing Risks Safely?
- Bird Feeders and Bug Hotels: How to Invite Nature Into Suburbia?
- The Poisonous Plant List: What to Remove Before Kids Play Freely?
- How to Store Shovels and Buckets to Prevent Standing Water?
- Why Reinforced Knees Are Essential for Crawlers on Hardwood Floors?
- Why Rigid Arch Support Can Weaken Muscles in Early Walkers?
- How to Spot Hidden Hazards in Public Playgrounds?
Mud Kitchens: Why Dirt Play Is Good for the Microbiome?
The first step in designing a natural playscape is to embrace its most fundamental element: the earth itself. Modern culture often fears dirt, associating it with germs and mess. However, from a developmental standpoint, a designated mud kitchen is one of the most valuable, and cheapest, features you can add. It’s a sensory powerhouse and a science lab rolled into one, where children can mix, measure, and create, engaging in what’s known as “loose parts play.”
But the benefits go far deeper than creativity. The real magic is happening at a microscopic level. The push for hyper-cleanliness has been linked to a rise in allergies and autoimmune issues. Playing in the dirt actively counters this. In fact, research shows that soil contains up to 10 billion microorganisms per gram, and exposure to this rich diversity is vital for building a robust immune system. A child’s microbiome—the community of bacteria living on and in their body—is trained by these early encounters with the natural world.
This isn’t just a theory; it’s been observed in practice. A fascinating trial in Finland introduced forest floor materials (rich soil, moss, and undergrowth) to urban daycare playgrounds. Within just one month, the children playing in this enriched environment showed a more diverse collection of healthy bacteria on their skin. According to a study on their immune systems, they also had higher levels of key immune-regulatory cells in their blood compared to children playing on sterile gravel surfaces. Creating a mud kitchen isn’t about making a mess; it’s about intentionally designing an inoculation station for a healthier life.
Your mud kitchen doesn’t need to be fancy. A few recycled pots, an old wooden pallet for a countertop, and access to dirt and water are all you need. The key is to create a designated, sanctioned space for this essential play, signaling to your child that this kind of exploration is not just allowed, but encouraged. It’s the first and most important zone in your backyard landscape.
Logs and Stumps: How to Create Natural Climbing Risks Safely?
Once your child is grounded in the earth, the next step is to introduce verticality and challenge. This is where you create opportunities for developmental risk. Instead of a static, predictable plastic climbing frame, a collection of logs, stumps, and wood rounds offers a dynamic and far more beneficial challenge. Balancing on an uneven surface, judging the distance for a step, and correcting a wobble are all complex neurological tasks that build proprioception—the body’s awareness of itself in space.
The goal is to design a course that grows with your child. A landscape architect for children would never install a one-size-fits-all structure. Instead, they would create a progressive system. For toddlers, this might mean logs laid flat on the ground, creating a simple border to walk along. As they grow, you can introduce more complex challenges.
- Ages 2-3: Place logs flat on the ground, no more than 6 inches high, and space them closely together for easy steps.
- Ages 4-5: Raise some logs to 12 inches high. Introduce a slight “wobble” by placing a log on uneven ground to challenge their balance.
- Ages 6+: Create varying heights up to 18 inches and increase the gaps between stumps to encourage bigger, more deliberate movements.
Before allowing play, test every single log for stability. A slight wobble is a good challenge; a log that could roll and trap a foot is a hidden hazard that must be fixed. The surrounding surface is just as important as the climbing elements. Natural materials like wood chips or mulch should be laid to a proper depth based on the maximum potential fall height.
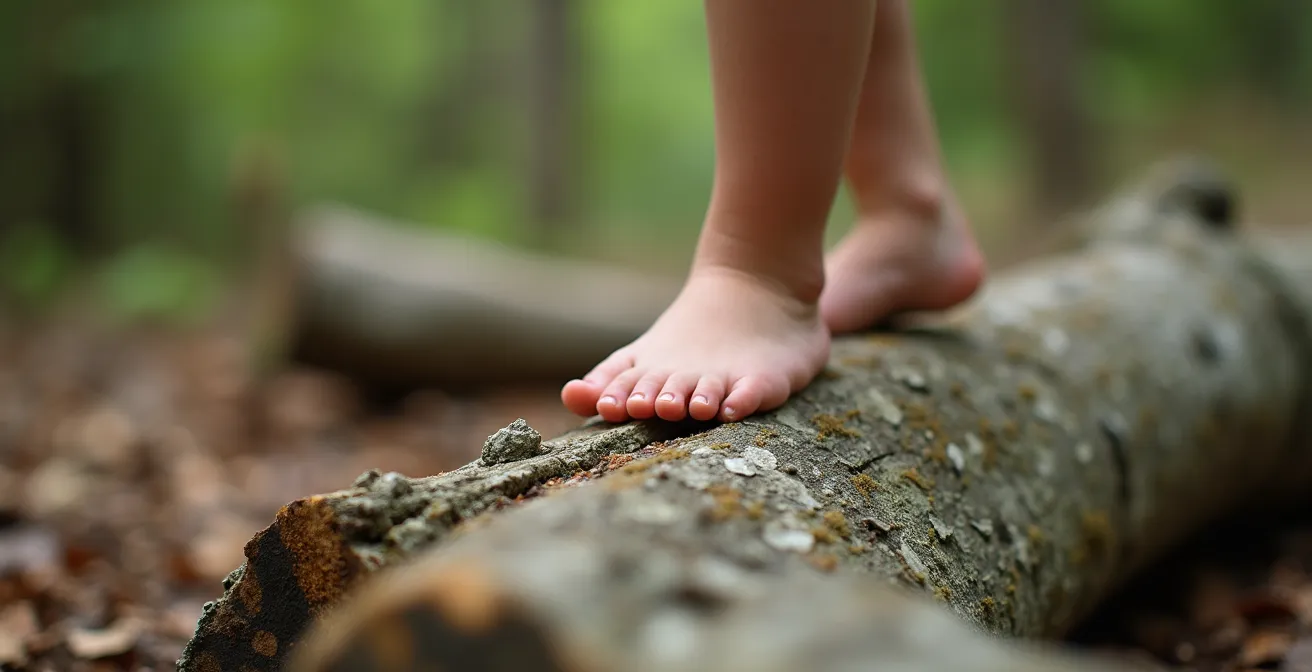
This close-up view demonstrates the intense focus and motor control required to navigate a natural surface. Every muscle in the foot is engaged to grip the textured bark and maintain balance. This is an experience no plastic playground can replicate. It’s an active dialogue between the child and their environment, building physical confidence with every step.
Your Backyard Safety Audit Checklist
- Head Entrapment Check: Survey your entire play area for any rigid openings between 3.5 and 9 inches where a child’s head could get stuck. This includes gaps in fences, between logs, or on climbing structures.
- Hardware Inspection: Run your hands over all surfaces and hardware. Are there any protruding bolts, sharp points, or splintered wood? File them down, cover them, or replace them immediately.
- Fall Zone Measurement: Use a tape measure to ensure there is a clear, unobstructed fall zone of at least 6 feet in all directions around any climbing equipment, including your log course and swings.
- Surfacing Depth Calculation: For equipment up to 5 feet high, you need at least 9 inches of uncompressed wood chips, mulch, or sand. Dig into a corner of your surfacing to check the depth.
- Swing Spacing Verification: If you have swings, ensure there is a minimum of 24 inches between each swing and between the swings and the support frame to prevent collisions.
Bird Feeders and Bug Hotels: How to Invite Nature Into Suburbia?
An adventure zone shouldn’t be a static environment. A truly engaging playscape is alive, and one of the best ways to bring it to life is by inviting local wildlife. Setting up bird feeders and bug hotels transforms the backyard from a place of play into a living laboratory. It provides endless opportunities for observation, empathy, and scientific thinking, all at a very low cost.
This isn’t about passive watching. It’s about active engagement. The goal is to create a “naturalist’s outpost.” One project saw families in Pennsylvania set up observation stations near their bird feeders, complete with DIY journals for tallying sightings and binoculars made from cardboard tubes. The children took ownership, researching the types of birds they saw and learning what seeds they preferred. They moved from being consumers of nature to becoming its stewards and scientists.
The same principle applies to the smaller, crawling creatures. A “bug hotel” is a simple structure made from recycled and natural materials that provides shelter for beneficial insects like solitary bees, ladybugs, and lacewings. These insects are not only fascinating to watch but are also crucial for a healthy garden ecosystem, helping with pollination and pest control. Building one is a lesson in ecology and engineering, and observing its residents fosters a sense of wonder and respect for all living things.
To design an effective bug hotel, you need to provide a variety of habitats to attract different species. Each material offers a unique type of shelter, turning your structure into a bustling apartment complex for insects.
| Material | Target Insects | Benefits |
|---|---|---|
| Bamboo canes (6-10mm diameter) | Mason bees | Pollination |
| Drilled logs | Solitary bees | Garden pest control |
| Pine cones & dry leaves | Ladybugs | Aphid control |
| Corrugated cardboard | Lacewings | Natural pest management |
The Poisonous Plant List: What to Remove Before Kids Play Freely?
As we design our natural playscape, we are intentionally blurring the lines between a manicured lawn and a wilder environment. This is wonderful for development, but it requires a landscape architect’s eye for safety—specifically, plant safety. Before you can encourage free exploration, you must do a thorough audit of your yard and remove any hidden botanical hazards.
The goal is not to create a sterile environment devoid of all but grass. Many beautiful plants are perfectly safe. The focus is on identifying and removing the truly dangerous ones while using the others as a teaching opportunity. The single most important rule to teach is to never, ever eat any part of a plant without asking a trusted adult first. This one boundary can prevent the vast majority of accidental poisonings.
Your audit should focus on two categories: plants that are toxic if ingested and plants that are skin irritants on contact. Common culprits in North American gardens include foxglove, lily of the valley, and certain parts of rhododendrons and yews. For skin irritants, be aware of plants like stinging nettle or wild parsnip. Consult a local plant guide or your regional extension office for a list specific to your area. This is a critical step in separating “developmental risk” from “unacceptable hazard.”
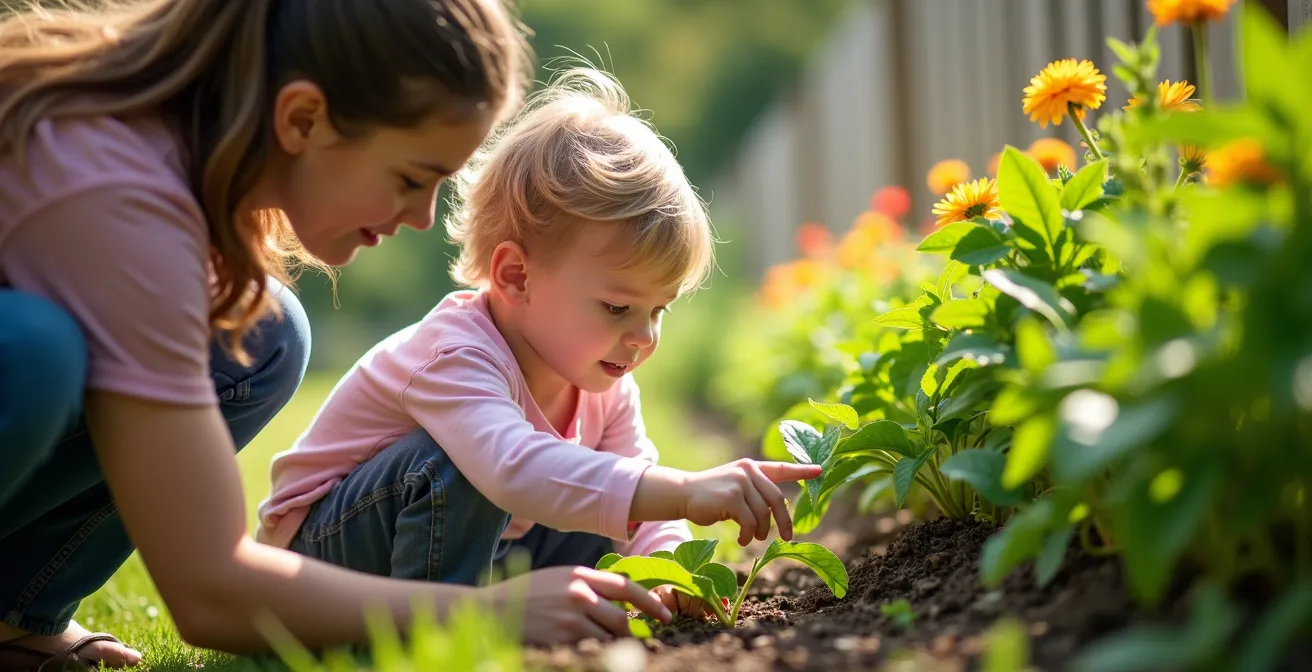
The process of identifying plants can become an adventure in itself. As shown here, you can involve your child in the process of learning about the garden. By using a field guide and teaching them to “point but don’t pick,” you transform a safety task into an empowering lesson in botany. They learn to respect nature, not fear it. They become knowledgeable caretakers of their own environment, capable of distinguishing friend from foe.
How to Store Shovels and Buckets to Prevent Standing Water?
An adventure zone is a place of active, messy creation. This means tools: shovels, buckets, trowels, and containers of all kinds. A key part of the landscape design is planning for the aftermath. How are these tools cleaned and stored? A poorly managed cleanup process can create genuine hazards, and the most common and overlooked one is standing water.
Any container left upright, from a small cup to a large bucket or wheelbarrow, can collect rainwater. This stagnant water is the perfect breeding ground for mosquitoes. In warm weather, health experts warn it takes just 7-10 days for mosquito larvae to develop. Preventing standing water is a non-negotiable health and safety requirement for any backyard playscape.
The solution is to design a dedicated, child-friendly storage station that makes cleanup easy and effective. The system should be built on a simple principle: water must always have a way to escape. This means storing items upside down or sideways, or modifying them to drain automatically. A well-designed station not only prevents hazards but also teaches children responsibility and respect for their tools and their play space.
Creating a DIY storage station is a simple and budget-friendly project. Consider these design elements:
- Install a series of sturdy hooks at a child’s height (around 36-42 inches) on a fence or the side of a shed for hanging tools.
- Drill drainage holes in the bottom of all plastic buckets and toy containers. This is the most crucial step.
- If using shelving, build it with a slight slant so that water naturally runs off.
- Use sections of wide PVC pipe mounted to a wall to create simple, weld-free racks for holding shovels and rakes.
- Label the zones with pictures (a picture of a shovel, a picture of a bucket) to help non-readers participate in cleanup.
Why Reinforced Knees Are Essential for Crawlers on Hardwood Floors?
While much of our adventure zone design focuses on the outdoors, a child’s exploration begins indoors. For babies and toddlers, the living room floor is their first wilderness. Surfaces like hardwood, tile, or laminate, while easy to clean, offer no cushioning for the repetitive pressure of crawling. This can lead to sore knees, discomfort, and a reluctance to explore. The adventurous spirit we cultivate outdoors must be protected indoors as well.
Outdoors, we solve this with soft surfacing like mulch or grass. A case study on backyard play areas showed that families created “soft zones” using interlocking rubber mats and deep wood chips, which successfully reduced knee injuries for crawlers transitioning between different surfaces. But covering your entire house in rubber mats isn’t practical. The more effective indoor solution is to adapt the child’s clothing, turning their everyday pants into “adventure gear.”
Reinforcing the knees of your child’s pants provides a mobile layer of protection that travels with them. This is a simple, no-cost modification that makes a significant difference in their comfort and willingness to move. It’s a classic example of applying a practical, low-tech solution to a common developmental hurdle. You don’t need to buy expensive, specialized clothing; you can create your own “adventure pants” from items you already own.
Here is a simple plan for reinforcing pants for your little explorer:
- Select the Garment: Choose old pairs of jeans, leggings, or soft play pants that are destined for rough-and-tumble wear.
- Cut the Patches: Cut patches from durable fabric like denim, cordura, or even soft leather. A 6×8 inch rectangle is a good starting size for a toddler.
- No-Sew Application: For a quick solution, use iron-on fusible interfacing to attach the patches. This is durable enough for most crawling.
- Sewing for Durability: For a permanent fix, use a sewing machine to double-stitch the patches onto the knees with a heavy-duty thread.
- Make them Special: Add a fun, decorative stitch or use a patch in a contrasting color or shape to celebrate their new “adventure pants.” This turns a practical item into something exciting.
Why Rigid Arch Support Can Weaken Muscles in Early Walkers?
As children graduate from crawling to taking their first wobbly steps, parents often rush to buy supportive, structured shoes. The common belief is that a child’s foot needs a rigid arch support to develop correctly. However, from a biomechanical perspective, the opposite is often true. The foot is a complex structure of 26 bones, 33 joints, and over 100 muscles, tendons, and ligaments. These muscles need to be worked to grow strong, just like any other muscle in the body.
Encasing a developing foot in a rigid “cast” can prevent these muscles from doing their job. It can effectively weaken the foot over time, making it dependent on artificial support. The best environment for an early walker is a varied, textured, and safe surface that they can experience barefoot. This is where the design of our natural playscape becomes critical once again.
Research on sensory play highlights the immense benefits of barefoot time. When a child walks on different textures—cool grass, warm sand, smooth stones, rough bark—thousands of nerve endings in their feet send a torrent of information to the brain. This feedback builds crucial neural connections that improve balance, coordination, and proprioception. Families who have created backyard “sensory paths” for barefoot walking report observing stronger, more agile foot muscles and better overall coordination in their young children.
A sensory path is easy and cheap to build. It’s simply a designated lane in your yard filled with different, safe, natural materials. The variety of textures provides a workout for the feet and a feast for the senses.
| Material | Sensory Input | Safety Level |
|---|---|---|
| Grass | Soft, tickly | Very safe |
| Smooth river stones | Hard, cool | Safe with supervision |
| Sand | Shifting, warm | Very safe |
| Wood rounds | Firm, textured | Safe if secured |
| Pea gravel | Unstable, massaging | Safe for 3+ |
Key Takeaways
- A successful adventure zone is designed, not bought. It prioritizes natural, low-cost materials over expensive plastic equipment.
- The goal is to manage risk, not eliminate it. Distinguish between hidden hazards (which must be removed) and developmental risks (which build resilience).
- Authentic play is sensory play. Engaging with dirt, varied textures, and living creatures is essential for immune, neurological, and emotional development.
How to Spot Hidden Hazards in Any Playground?
Once you’ve trained your eye to see your own backyard as a landscape architect, you can apply that skill anywhere. You begin to see all play environments—local parks, schoolyards, a friend’s backyard—with a new level of awareness. This final piece of expertise is about empowering you to be a safety advocate for your child no matter where they play. You learn to spot the hidden hazards that others might overlook.
Public playgrounds are built to meet specific safety standards, but equipment ages, maintenance can lapse, and hazards can develop. The most critical standard relates to fall zones. According to the U.S. Consumer Product Safety Commission (CPSC), safety standards require at least a 6 feet minimum fall zone of clear, unobstructed space in all directions around a piece of equipment. The surfacing within that zone must also be deep and soft enough to cushion a fall.
Other common hazards include head entrapment spaces (openings between 3.5 and 9 inches), protruding bolts or hardware that could snag clothing, and improperly spaced swings. Knowing what to look for allows you to do a quick, two-minute audit of any playground before your child begins to play. This isn’t about being fearful; it’s about being informed. It’s the final step in embodying the role of a child’s environmental designer: ensuring the space is cleared of all non-negotiable hazards so that they are free to take on the healthy, developmental risks of play.
By cultivating this awareness, you are giving your child the ultimate gift: the freedom to explore with confidence, knowing that the adult in their life has ensured the world around them is as safe as it needs to be, but as challenging as they need it to be. This is the core philosophy of the adventure zone, extended to the world at large.
Your role as a children’s landscape architect is now clear. By focusing on natural materials, embracing managed risk, and designing for development, you can create a backyard that is more than just fun—it is a crucible for growing a resilient, curious, and capable human being. Start today by looking at your yard not for what it is, but for what it could become.
Frequently Asked Questions on Backyard Adventure Zones
What’s the most important rule to teach children about plants?
Never eat any plant without asking an adult first – this single rule can prevent most plant poisoning incidents. It establishes a crucial boundary that empowers children to explore visually while ensuring their safety.
Should I remove all potentially harmful plants?
Focus on removing the most dangerous ones while teaching identification of others as an educational opportunity. A yard with only grass is a sterile environment; a yard where a child can identify three “no-touch” plants is a living classroom.
What are common skin irritants often overlooked?
While poison ivy is well-known, other plants like stinging nettle, wild parsnip, and certain look-alikes of giant hogweed can cause significant rashes or even burn-like reactions on contact. Learning to identify these is as important as identifying toxic berries.