In summary:
- Focus on accessories that solve practical problems, like keeping pants up or hair out of eyes.
- A single statement piece, like a scarf or vintage brooch, can make a hand-me-down feel brand new.
- Prioritize safety by performing simple, at-home tests on all accessories for children under three.
- Incorporate DIY and upcycled items to teach resourcefulness and create truly unique looks.
- Use accessories as the flexible core of a year-round capsule wardrobe, adapting basic clothing for any season.
The cycle feels endless: just as you fill their drawers, your child hits another growth spurt, and their once-perfect clothes are suddenly too short or too tight. For budget-savvy parents, the thought of buying another whole new wardrobe is daunting. The common advice is to “add a pop of color” with generic, often flimsy accessories. But this approach rarely addresses the real challenges of dressing kids: functionality, durability, and making worn clothes feel exciting again.
What if the secret wasn’t just adding more “stuff,” but in wielding a few key accessories with strategic intent? The real power lies in their functional magic. An accessory shouldn’t just be cute; it should be a problem-solver, a value-multiplier that can secure ill-fitting pants, protect from the elements, and breathe new life into a basic t-shirt or a hand-me-down coat. It’s about seeing accessories as the hardest-working items in your child’s closet.
This guide moves beyond simple decoration. We will explore how specific, affordable accessories act as functional upgrades. From the physics of keeping a clip in fine hair to the safety engineering you can perform at home, you’ll discover how to make smart, resourceful styling choices. You’ll learn to transform the mundane into the magnificent, building a versatile and long-lasting wardrobe for under $50.
This article breaks down the essential, high-impact accessories that deliver the most value. Discover how to select, adapt, and even create pieces that will redefine your child’s style and your budget.
Summary: The Ultimate Guide to Kid’s Wardrobe-Transforming Accessories
- Why a Statement Scarf Can Upgrade a Hand-Me-Down Coat Instantly?
- How to Select Hair Clips That Actually Stay in Fine Baby Hair?
- Belts vs. Suspenders: Which Keeps Pants Up Better for Skinny Toddlers?
- The Bead Risk: Which Accessories Are Unsafe for Children Under 3?
- When to Switch From Sun Hats to Beanies Based on UV Index?
- How to Integrate Vintage Finds Into a Modern Wardrobe for Unique Style?
- Why Making Costumes From Trash Teaches Kids About Resource Value?
- How to Build a Capsule Wardrobe for Kids That Lasts All Year?
Why a Statement Scarf Can Upgrade a Hand-Me-Down Coat Instantly?
A hand-me-down coat is a budget-friendly win, but it can often feel a bit lackluster or dated. A statement scarf is more than just a neck warmer; it’s a tool of transformation. It works by introducing new color, texture, and volume right at the neckline, drawing the eye upward and away from any signs of wear on the coat itself. A bright, patterned scarf can completely shift the color palette of an outfit, making the old coat feel like a deliberate, stylish backdrop rather than a second-hand necessity.
The magic is in the contrast. A chunky knit scarf adds cozy texture to a simple wool coat, while a silky, colorful one can elevate a plain puffer jacket. This single point of focus re-frames the entire look. Furthermore, personalizing a basic scarf with fabric markers or iron-on patches, a technique championed by frugal fashion experts like Mary Hunt, gives a child a sense of ownership, turning a simple hand-me-down into a cherished “new” favorite they are excited to wear.
Mastering a few simple tying techniques ensures the scarf is both stylish and practical for active kids. Instead of a complicated knot, try one of these kid-friendly methods:
- The Simple Loop: Fold the scarf in half, wrap it around the neck, and pull the two ends through the loop. This is easy enough for a preschooler to do themselves.
- The Hidden Knot: Tie a loose knot near one end, drape the scarf around the neck, and slip the other end through the knot for a secure yet comfortable fit that won’t easily come undone.
- The Cozy Wrap: Simply wrap the scarf twice around the neck with the ends hanging evenly. This is ideal for toddlers who need warmth without complexity.
- The Side Twist: Place the scarf around the neck with one end longer than the other, wrap the long end around once, and tuck it into the wrap for an adjustable, stylish look.
By acting as a “wardrobe multiplier,” one or two versatile scarves can create dozens of new-feeling combinations, proving that a small investment can yield a huge stylistic return.
How to Select Hair Clips That Actually Stay in Fine Baby Hair?
For parents of babies and toddlers with fine, wispy hair, the battle of the sliding hair clip is a familiar frustration. A clip that can’t grip is not just a lost accessory; it’s a functional failure. The secret to success isn’t the clip’s decoration, but its engineering—specifically, the grip material and weight-to-clip ratio. A pretty bow is useless if it ends up on the floor in five minutes.
The most crucial feature is a non-slip lining. Standard metal alligator clips slide right out of fine hair. To get a secure hold, you need a clip lined with a material that creates friction. Velvet, silicone, and felt are the top contenders, each offering a different level of grip and hair protection. A well-designed clip prevents the breakage and pulling that can come from clips that are too tight or poorly made.
Understanding the different grip types is key to making the right choice, as a recent comparative analysis shows.
| Grip Type | Hold Strength | Hair Protection | Best For |
|---|---|---|---|
| Silicone Strips | Good | Moderate | Normal to fine hair |
| Velvet Lining | Better | High | Prevents breakage |
| Felt-lined Alligator | Best | Very High | Ultra-fine, wispy hair |
Equally important is the weight balance. A heavy decoration on a small clip will inevitably droop and fall. Follow these guidelines to ensure the clip can support its ornament: for clips under one inch, use only lightweight decorations like a single ribbon. For clips over two inches, you can use heavier items like multi-layer bows. A simple test is to hold the clip horizontally; if the decoration droops more than 45 degrees, it’s too heavy for the clip’s size and will not stay put.
By prioritizing the functional aspects of grip and balance, you can finally win the war against sliding clips and keep your little one’s hair stylishly and comfortably in place.
Belts vs. Suspenders: Which Keeps Pants Up Better for Skinny Toddlers?
The “droopy drawers” syndrome is a classic toddler dilemma, especially for slim children who haven’t yet developed hips to hold up pants. This leaves parents choosing between two traditional solutions: belts and suspenders. While both aim to solve the same problem, they offer very different experiences for an active child. Suspenders provide excellent vertical lift and are almost foolproof for keeping pants up, but they can be cumbersome for potty training and may feel restrictive over the shoulders.
Belts, on the other hand, offer more independence but often fail on toddlers. A traditional buckle belt is difficult for small hands and can create a bulky, uncomfortable lump under a shirt. For a belt to work on a skinny toddler, it must be elastic, adjustable, and have a flat, simple clasp. Magnetic clasps or simple interlocking buckles are far superior to traditional prong-and-hole designs, allowing a child to manage their own clothes more easily.
This image demonstrates how an elastic, flat-clasp belt allows for complete freedom of movement during play, solving the problem without hindering activity.

However, the best answer might not be a belt or suspenders at all. Innovative “third-way” solutions are often the most effective. Products like Dapper Snappers—a short piece of elastic that cinches the back belt loops—or pants with built-in adjustable side tabs provide a bulk-free, sensory-friendly fix. These alternatives are particularly effective as they integrate seamlessly with the clothing, holding pants in place without creating pressure points or adding another layer for a child to manage.
For skinny toddlers, the optimal solution is often the one that is most invisible, providing support without restricting their freedom to move, play, and learn.
The Bead Risk: Which Accessories Are Unsafe for Children Under 3?
For children under the age of three, an accessory isn’t just a style choice—it’s a potential safety hazard. The curiosity of this age group means anything and everything can end up in their mouths, ears, or noses. Small parts that detach from accessories are a primary cause of choking, a silent and swift danger. In fact, recent Cleveland Clinic data shows that over 155,000 children under 12 were treated in emergency departments for toy-related injuries in a single year, with small parts being a major culprit.
Any accessory containing beads, small buttons, decorative gems, or even batteries poses a significant risk. The key is to assess not just the item itself, but its potential to break apart into smaller components. A necklace with large beads may seem safe, but if the string breaks, each individual bead becomes a choking hazard. Similarly, hair bows with glued-on rhinestones or barrettes with small plastic characters can easily shed their decorative parts.
Parents must become diligent safety inspectors. Before giving any accessory to a child under three, it’s crucial to perform a series of simple but effective tests. This protocol empowers you to identify hazards before they become a danger.
Your Action Plan: The Parent’s Safety Testing Protocol
- Perform the Tug Test: Pull firmly for 10 seconds on all beads, buttons, and decorative elements to ensure they are securely attached.
- Conduct the Shed Test: Rub the accessory with a damp white cloth to check if any dyes or paints transfer, as they could be toxic.
- Apply the Tube Test: As recommended by agencies like the CPSC, any part that can fit entirely inside a standard toilet paper roll is a choking hazard for a child under three.
- Check Battery Compartments: If an accessory has batteries (e.g., light-up shoes), ensure the compartment is secured with a screw and requires a tool to open.
- Inspect for Sharp Edges: Run your fingers along all seams, edges, and clasps to detect any sharp points or rough surfaces that could cause cuts.
For this vulnerable age group, the safest accessory is often the simplest one. When in doubt, always opt for items that are a single, solid piece with no detachable parts.
When to Switch From Sun Hats to Beanies Based on UV Index?
Choosing between a sun hat and a beanie seems like a simple matter of temperature, but a more strategic approach involves another critical factor: the Ultraviolet (UV) Index. The UV Index measures the strength of the sun’s harmful rays, which can be surprisingly high even on cool or cloudy days. Protecting a child’s sensitive skin and eyes is a year-round responsibility, making the UV Index a better guide than temperature alone.
The general rule is straightforward: when the UV index is 3 or higher, sun protection is a must. This calls for a wide-brimmed sun hat with a UPF 50+ rating, which blocks at least 98% of UVA and UVB rays. The brim is essential for shielding the face, neck, and ears—areas highly susceptible to sunburn. On a cool but sunny spring day with a high UV index, a beanie is the wrong choice, as it offers no sun protection.
Conversely, when the UV Index is below 3, the primary concern shifts from sun protection to warmth. This is when beanies and other warm hats take center stage. The choice then becomes about the material and insulation needed for the current temperature. A lightweight cotton beanie might be perfect for a crisp autumn day, while a fleece-lined trapper hat is necessary for freezing winter weather.
This decision matrix, based on guidance from retailers like The Children’s Place, simplifies the choice between sun safety and warmth.
| UV Index | Temperature | Recommended Headwear |
|---|---|---|
| 3+ | Above 40°F/5°C | UPF 50+ Sun Hat with Brim |
| 3+ | Below 40°F/5°C | Fleece-lined Baseball Cap |
| Below 3 | Below 40°F/5°C | Warm Beanie or Trapper Hat |
| Below 3 | 40-60°F/5-15°C | Lightweight Cotton Beanie |
This two-factor approach ensures your child is always appropriately protected, whether the biggest threat is a sunburn on a cool day or frostbite in the dead of winter.
How to Integrate Vintage Finds Into a Modern Wardrobe for Unique Style?
Thrift stores and grandparents’ jewelry boxes are treasure troves of unique accessories that can add personality to a child’s modern wardrobe. A vintage brooch, a classic silk scarf, or a retro belt buckle offers a touch of history and character that mass-produced items lack. The key to successful integration is the principle of “one special piece.” Instead of a full vintage look, which can appear costumey, focus on using a single vintage accessory as the focal point of an otherwise simple, contemporary outfit.
Imagine a crisp denim jacket, a modern staple, instantly elevated by a single, intricate vintage floral brooch pinned to the lapel. Or a simple t-shirt and jeans combo transformed by a beautifully patterned silk scarf from the 1970s, used as a belt or neckerchief. This high-low mix—pairing something old and detailed with something new and simple—creates a look that is both stylish and deeply personal.
This close-up shows how a single vintage piece can become the star of a modern, casual garment, adding texture and a story.
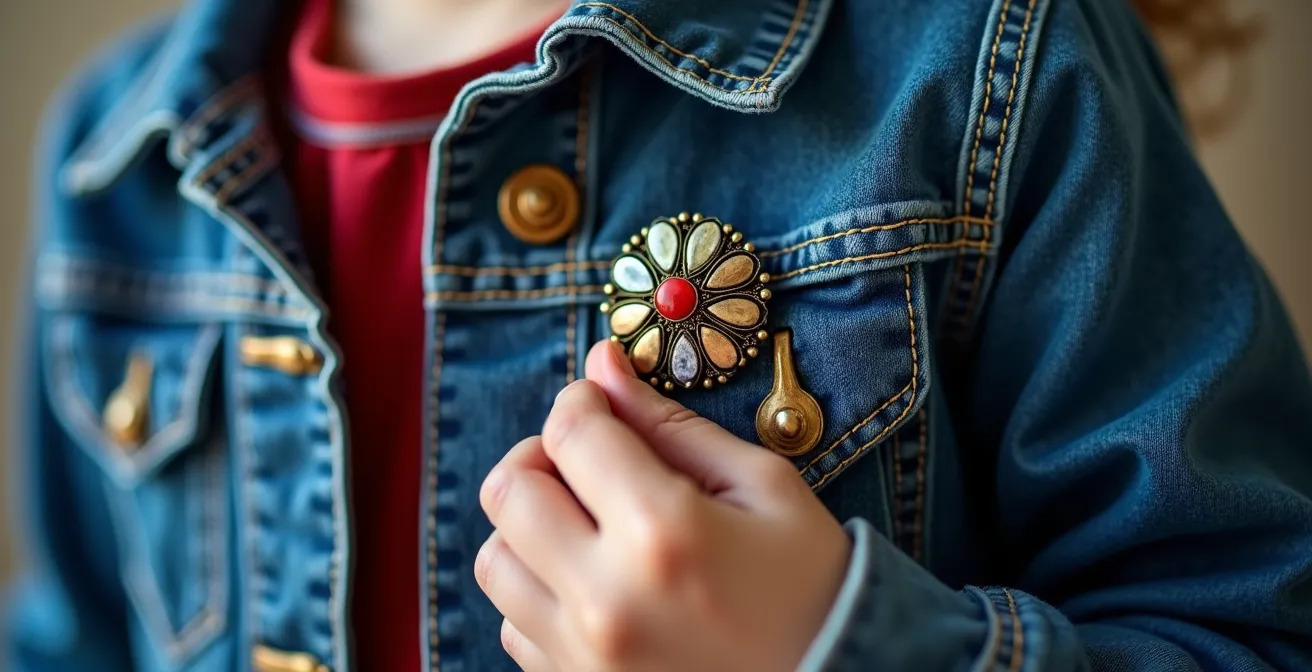
However, bringing vintage accessories into a child’s wardrobe requires a crucial extra step: a thorough safety and modernization check. Older items were not made to today’s safety standards. It’s essential to clean, repair, and test finds before wear. Metals may tarnish, clasps can be weak, and items made before 1978 could even contain lead paint. A few simple steps can make these treasures safe and ready for a new generation: clean tarnished metal with a gentle baking soda paste, replace old clasps with modern safety or magnetic versions from a craft store, and reinforce any loose stones with jewelry glue.
This thoughtful approach not only creates a one-of-a-kind style but also teaches children to value history and the art of giving beautiful old things a new life.
Why Making Costumes From Trash Teaches Kids About Resource Value?
In a world of single-use items and fast fashion, turning “trash” into treasure is a powerful lesson in resourcefulness and creativity. Making costumes from everyday discarded materials—cardboard boxes, plastic bottles, fabric scraps—is more than a fun, rainy-day craft. It’s a hands-on education in circular economy principles. When a child transforms a pile of recycling into a robot suit or a knight’s armor, they learn a fundamental concept: value is not inherent in an object but is created through imagination and effort.
This process directly counters the consumerist mindset that new things must be bought to have fun. It shifts their perspective from being a passive consumer to an active creator. They begin to see potential everywhere: a yogurt cup becomes a spaceship jet, bubble wrap becomes alien skin, and bottle caps become gleaming jewels on a crown. This act of upcycling fosters critical problem-solving skills, ingenuity, and an appreciation for the materials we often throw away without a second thought.
To encourage this creative mindset, the best first step is to build a dedicated “Inventor’s Box.” This is not a box of curated craft supplies, but a collection of clean, safe “trash” that is ripe for reinvention. Keeping this resource on hand makes spontaneous creating easy.
- Collect clean cardboard tubes, boxes, and egg cartons for building structures.
- Save thoroughly cleaned plastic bottles and containers for props and armor pieces.
- Gather fabric scraps, old t-shirts, and worn-out sheets for making capes and costume bases.
- Keep aluminum foil, bubble wrap, and other packing materials for adding unique textures.
- Store a collection of buttons, bottle caps, and jar lids to use as decorative details and knobs.
By empowering children to create their own worlds from discarded items, you give them a gift far more valuable than a store-bought costume: the confidence that they can make something amazing out of anything.
Key takeaways
- Function First: The best accessories for kids solve a problem, from keeping pants up to ensuring a clip stays in fine hair.
- Safety is Non-Negotiable: Always test accessories for small parts, sharp edges, and toxic materials before giving them to a child under three.
- One-Piece Transformation: A single, well-chosen item like a statement scarf or a unique vintage pin can elevate an entire hand-me-down or basic outfit.
How to Build a Capsule Wardrobe for Kids That Lasts All Year?
A capsule wardrobe for kids seems like a smart idea, but its success hinges on one often-overlooked element: accessories. While the core clothing pieces—neutral tops, durable bottoms—provide the foundation, it’s the accessories that give the capsule its flexibility, personality, and year-round adaptability. The accessories discussed throughout this guide are not just add-ons; they are the strategic tools that make the capsule system work.
Think of it as a core and shell system. The core is a small collection of versatile basics in a limited color palette (e.g., navy, cream, gray). The “shell” is your collection of accessories, which allows you to adapt that core for any season or occasion. For example, in the summer, a sun hat and sandals make a navy t-shirt and shorts a complete outfit. In the fall, you can take that same t-shirt, add a long-sleeve shirt underneath, and transition it with a cozy beanie and a colorful scarf. The clothes remain the same; the accessories signal the change in season.
This strategy is incredibly budget-friendly. Instead of buying four distinct seasonal wardrobes, you maintain one core wardrobe and invest in a handful of affordable, high-impact accessories. A warm winter hat and mittens cost far less than several new sweaters and coats. The key is to choose a base color palette for the clothing and an accent color palette for the accessories (e.g., navy/ochre/cream), ensuring everything can be mixed and matched effortlessly.
Start by auditing your child’s current clothes to find a solid base, and then begin acquiring the functional, stylish, and safe accessories that will transform that small collection into a wardrobe with limitless possibilities.