Making the leap to a two-wheel scooter is less about age and more about a technical readiness that can be measured through specific skill assessments.
- Dynamic balance, demonstrated by gliding for 3-5 seconds, is the most reliable indicator of readiness.
- Scooter-specific safety gear, particularly a skate-style helmet with occipital protection, is a non-negotiable technical requirement.
Recommendation: Use the one-leg glide test as your primary benchmark and ensure all safety equipment is correctly specified before attempting the transition.
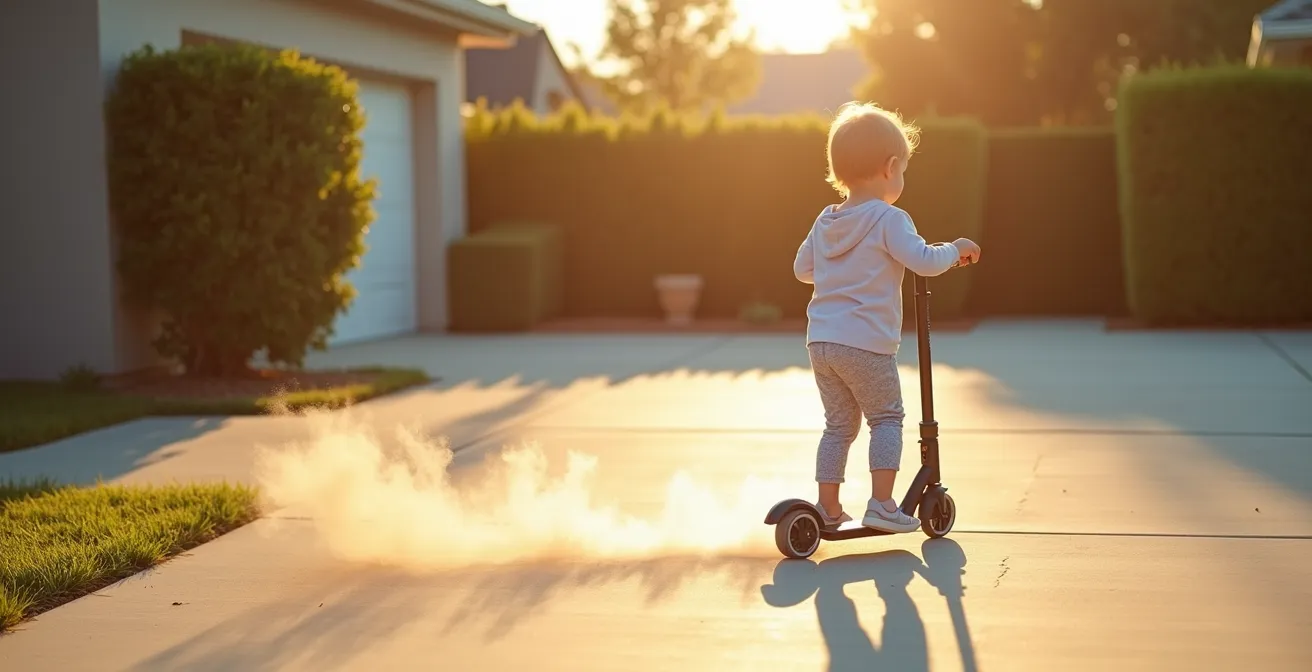
You see them outgrow it in real-time. The three-wheel scooter that was once a perfect fit now looks small, their knees bent a little too much as they push off. The question naturally arises: is it time for two wheels? Many parents wait for a vague sense of “confidence” or reach for a specific age milestone. While well-intentioned, these are unreliable metrics for a transition that involves a significant leap in motor skills and dynamic balance.
The move from a stable, lean-to-steer three-wheeler to an inherently unstable two-wheeler is a critical step in a child’s mobility development. It requires more than just the ability to stand on one leg; it demands the capacity to maintain equilibrium while in motion, process environmental feedback instantly, and execute precise braking maneuvers. From a mobility instruction standpoint, this transition isn’t an event to be rushed but a technical milestone to be assessed.
This guide departs from subjective advice. Instead, it provides a series of objective, test-based criteria to evaluate your child’s readiness. We will dissect the biomechanics and physics at play, from the specific demands on balance to the critical importance of equipment selection. We’ll explore why a bike helmet may offer insufficient protection, how wheel size dictates safety on imperfect surfaces, and why proper footwear is as crucial as the scooter itself. By understanding the technical requirements, you can make an informed, safety-conscious decision that empowers your child for success.
This comprehensive overview will equip you with an instructor’s perspective, covering every aspect from physical readiness to essential gear. Follow this guide to confidently determine the right moment for your child to embrace the challenge of two wheels.
Summary: A Technical Guide to the Scooter Transition
- The One-Leg Test: How to Know If Your Child Can Handle 2 Wheels?
- Why a Bike Helmet Might Not Protect the Occipital Bone on a Scooter?
- Small vs. Large Wheels: Which Is Safer for Uneven Sidewalks?
- How to Teach the Foot Brake vs. Hand Brake to a 4-Year-Old?
- How to Clean Scooter Bearings After a Ride Through Puddles?
- How to Size Up Denim Without It Falling Down While Running?
- The Oversized Bag Mistake That Throws Off a Child’s Center of Gravity
- Which Shoe Features Support Healthy Foot Development for First Walkers?
The One-Leg Test: How to Know If Your Child Can Handle 2 Wheels?
The single most important prerequisite for transitioning to a two-wheel scooter is not age, but the mastery of dynamic balance. This is the ability to maintain stability while the body is in motion, a far more complex skill than the static balance required to simply stand on one foot. A three-wheel scooter, with its stable triangular base, does not require dynamic balance; a two-wheel scooter is entirely dependent on it. The rider’s forward momentum is what creates stability, and the rider must constantly make micro-adjustments to stay upright.
Research and observation consistently show that dexterity and developed motor skills are better predictors of readiness than a child’s age. A two-wheel scooter turns by rotating the handlebar, an action that requires more refined coordination than the lean-to-steer mechanism of most three-wheelers. Before making the switch, it is crucial to objectively assess whether a child possesses the core stability and steering control necessary for this more complex operation.
To move beyond guesswork, you can perform a simple series of drills that act as a technical audit of your child’s readiness. These tests evaluate gliding stability, reaction time, and steering precision—the three pillars of safe two-wheel scooter operation.
Your Scooter Readiness Audit: 3 Key Performance Tests
- The Long Glide Assessment: On their current 3-wheel scooter, have your child push off forcefully and then lift both feet to glide. They should be able to maintain a stable, straight glide for a full 3 to 5 seconds without wobbling or needing to put a foot down. This demonstrates the core stability essential for 2-wheel riding.
- The Emergency Stop Drill: Practice a “Red Light, Green Light” game where you give sudden commands to stop. The child must be able to brake smoothly and come to a controlled halt without losing their balance. This tests their braking reaction time and ability to recover stability after a sudden maneuver.
- The Slalom Steering Test: Use chalk to draw a simple zigzag or slalom path on the pavement. A child who is ready for two wheels should be able to navigate the course smoothly while maintaining speed, indicating their steering control is sufficiently developed for handlebar-based turning.
If a child can successfully and repeatedly perform these three tasks, they have demonstrated the fundamental skills required to safely manage a two-wheel scooter.
Why a Bike Helmet Might Not Protect the Occipital Bone on a Scooter?
A helmet is the single most critical piece of safety equipment, yet not all helmets are engineered for the specific physics of a scooter fall. While a bicycle helmet is excellent for cycling, its design may leave a crucial area exposed during a scooter-related impact: the occipital bone at the back of the skull. This discrepancy stems from the fundamental difference in fall dynamics between the two activities. Bicycle falls are predominantly forward, often over the handlebars. Consequently, bike helmets are designed with an emphasis on frontal and side impact protection, frequently featuring a tapered rear and large vents for airflow.
Scooter falls, however, are far more unpredictable. A loss of balance can send a rider sideways or, very commonly, backwards. This is where the standard bike helmet design shows its limitations. The physics of a scooter ejection means there is a significant risk of impacting the back of the head. In fact, research into head impacts has highlighted a high proportion of occipital impacts in various collision scenarios, underscoring the need for comprehensive rear coverage.
To address this specific risk, a “skate-style” helmet is the technically superior choice for scooter riding. These helmets are characterized by a rounded, bucket-shape design that provides significantly more coverage over the occipital region and the base of the skull.

As the visual comparison shows, the skate-style helmet (right) offers a solid, continuous protective shell at the rear, whereas the bike helmet (left) often has gaps and a higher cut. For a young rider learning the complexities of dynamic balance, the multi-directional fall protection offered by a skate-style helmet provides a critical safety margin that a standard bike helmet may not. Always look for helmets certified by the CPSC (Consumer Product Safety Commission) or meeting ASTM F1492 (skate) standards for proven impact resistance.
Choosing the right helmet is not about aesthetics; it is a technical decision based on the specific impact risks associated with the activity.
Small vs. Large Wheels: Which Is Safer for Uneven Sidewalks?
Wheel size is a critical safety and performance variable that is often overlooked. It directly dictates how a scooter interacts with its environment, especially on real-world surfaces like uneven sidewalks, cracks, or small debris. The choice between small (100-120mm) and large (145-200mm) wheels is a technical trade-off between agility and stability. For a child transitioning to two wheels, understanding this trade-off is key to preventing sudden, unexpected falls.
Small wheels create a lower center of gravity, making the scooter feel lighter and more maneuverable. While this is advantageous for tricks and smooth skate parks, it introduces a significant hazard on typical pavements. A small wheel has a greater chance of being stopped dead by a small obstacle like a pebble, a crack, or a raised edge of a sidewalk slab. This abrupt stop is a “failure point” that can pitch the rider forward with no warning. Furthermore, the braking system on a small wheel has less surface area to grip, potentially reducing its effectiveness.
Larger wheels, by contrast, possess a greater ability to roll over obstacles. Their larger circumference allows them to bridge gaps and climb over imperfections that would stop a smaller wheel. This results in a smoother, more stable ride and provides a crucial safety margin by reducing the risk of sudden stops. The table below, based on an analysis of scooter specifications, breaks down the key differences.
| Wheel Size | Best Surface | Safety Advantages | Limitations |
|---|---|---|---|
| 100-120mm (Small) | Smooth pavements | Lighter, easier to maneuver, lower center of gravity | Can stop abruptly at cracks/pebbles |
| 145-200mm (Large) | Uneven surfaces | Rolls over obstacles, smoother ride, better shock absorption | Heavier, less agile for tricks |
For a young rider who is still mastering dynamic balance and may not have the lightning-fast reflexes to react to sudden jolts, a scooter with larger wheels offers a more forgiving and ultimately safer platform for learning.
How to Teach the Foot Brake vs. Hand Brake to a 4-Year-Old?
Effective braking is as important as balancing. Most children’s two-wheel scooters come equipped with a rear-fender foot brake, while some advanced models may also include a bicycle-style hand brake. For a 4-year-old, the foot brake should be the primary focus of instruction. It is more intuitive, as it utilizes a gross motor skill (stomping) that is already well-developed. It also encourages a proper braking posture, where the child shifts their weight backward, further increasing stability during deceleration.
Hand brakes, conversely, require significant fine motor skills and hand strength that many young children have not yet developed. A simple readiness test is to see if your child can easily operate a spray bottle or a single-hole paper punch. If they struggle with these tasks, they likely lack the requisite strength to effectively modulate a hand brake lever, which could lead to them either not braking hard enough or grabbing the brake too suddenly and losing control. Therefore, teaching should begin with and master the foot brake first.
A progressive training method, moving from stationary practice to dynamic challenges, is the most effective way to build braking competence and confidence. The process should be broken down into simple, repeatable steps.
This image demonstrates the correct body position for using a foot brake—weight shifted back, head up, and the heel applying firm, steady pressure to the rear fender. This technique maximizes control and stability.
The following progressive method breaks down the learning process:
- Off-Scooter Practice: Start on grass without the scooter. Make a game out of the “heel stomp” motion, having the child pretend to squash bugs with their heel. This isolates and reinforces the fundamental movement.
- Stationary Practice: Have the child stand on the scooter (held stationary by you) and practice pressing the foot brake on and off repeatedly to get a feel for the pressure required.
- Slow Gliding Taps: On a smooth, flat surface, give the child a gentle push and have them practice light, intermittent taps on the brake while moving slowly.
- Stopping Challenges: Set up a chalk line or a small cone as a “stop sign” and challenge the child to glide and come to a complete, controlled stop at the designated mark.
Only after a child has completely mastered the foot brake and demonstrates sufficient hand strength should you consider introducing the concept of a hand brake.
How to Clean Scooter Bearings After a Ride Through Puddles?
While a ride through a puddle can be a moment of pure childhood joy, it’s a significant threat to the scooter’s mechanical integrity and, by extension, its safety. The wheel bearings—the small, precise components that allow the wheels to spin freely—are highly susceptible to water and dirt. When water displaces the grease inside a bearing, it leads to rust and corrosion. A rusty bearing will not spin smoothly, creating friction and drag. In a worst-case scenario, a bearing can seize completely, causing the wheel to lock up and creating a severe fall hazard.
Therefore, post-puddle maintenance is not just about keeping the scooter looking clean; it is a critical safety procedure. Performing a quick maintenance routine immediately after exposure to water can prevent long-term damage and ensure the scooter remains safe and performant. This doesn’t have to be a complicated, time-consuming task. A simple, five-minute routine is all that is needed to displace water, protect the metal, and keep the wheels spinning as they should.
This “Puddle Rescue” routine should become a standard part of scooter ownership, taught to the child as a responsibility that comes with the fun of riding. The following steps outline the immediate actions to take after a ride through water.
The 5-Minute Puddle Rescue Routine:
- Wipe Down: Immediately use a dry microfiber cloth to thoroughly wipe the wheels, fender, and the visible sides of the bearings. The goal is to remove all surface water and grit.
- Displace Water: Spray a water-displacing lubricant like WD-40 directly onto the bearing area on both sides of each wheel. Crucially, avoid spraying the brake surface or the top of the scooter deck, as this can make them dangerously slick.
- Spin Out Moisture: Manually spin the wheels for 10-15 seconds each. This action uses centrifugal force to help distribute the lubricant and expel any remaining water from inside the bearing assembly.
- Wipe Excess: Use a clean, dry cloth to wipe away any excess lubricant from the wheel and frame.
- Re-Lubricate: For long-term protection, add a single drop of a dedicated bearing lubricant (such as bike chain oil or 3-in-1 oil) to the shield of each bearing. Spin the wheel again to distribute it.
By consistently following this procedure, you will significantly extend the life of the scooter’s bearings and prevent a catastrophic failure caused by rust and corrosion.
How to Size Up Denim Without It Falling Down While Running?
A discussion about scooter safety is incomplete without addressing rider attire. Clothing is not merely a matter of style; it is functional safety equipment. Ill-fitting or inappropriate clothing can introduce significant hazards, either by restricting movement or creating a risk of entanglement. Safety research consistently emphasizes the importance of dressing for the ride, and this includes avoiding any loose clothing that could get caught in wheels or brake mechanisms.
The specific challenge of “sizing up” jeans for a growing child presents a classic safety dilemma. Pants that are too long can drag and get caught under the rear wheel, while a waist that is too loose can cause the pants to slip down during the dynamic movements of riding, potentially tripping the child or distracting them at a critical moment. The ideal clothing for scooter riding is athletic-fit apparel that allows for a full range of motion without any loose, dangling fabric.
However, if denim is the preferred choice, it must be selected with safety in mind. To size up jeans without them becoming a hazard, look for two key features:
- Adjustable Waistbands: Many children’s jeans come with internal elastic bands and buttons that allow you to cinch the waist for a secure fit, even if the length is a size up. This is the single most important feature for preventing pants from slipping down.
- Stretch Denim: Look for jeans blended with a small percentage of elastane or spandex. This provides the necessary freedom of movement for a child to squat, bend their knees, and shift their weight to maintain balance, something that rigid, 100% cotton denim can restrict.
If you purchase jeans that are too long, they must be hemmed or cuffed securely so there is no possibility of fabric touching the wheels.
Ultimately, the principle is simple: clothing must allow for unrestricted movement while remaining completely clear of the scooter’s moving parts.
The Oversized Bag Mistake That Throws Off a Child’s Center of Gravity
A core principle of maintaining balance on any two-wheeled vehicle is managing the rider’s center of gravity. For a small child on a lightweight scooter, any external load can have a dramatic and destabilizing effect. A common but dangerous mistake is allowing a child to ride while wearing an oversized or improperly secured backpack. A swinging bag acts like a pendulum, shifting the child’s center of gravity unpredictably and making it exponentially more difficult to maintain balance, especially during turns or when avoiding an obstacle.
Furthermore, carrying items introduces a secondary hazard: the temptation to ride one-handed. A child might try to adjust a slipping bag or hold an object, taking a hand off the handlebars. This is a critical safety violation. Authoritative safety guidelines emphasize that riders must always keep both hands on handlebars to maintain maximum control. A non-negotiable rule for scooter riding should be that nothing is ever carried in the rider’s hands.
The solution is not to forbid carrying essentials like a water bottle or a small snack, but to choose storage solutions specifically engineered for dynamic activities. These options keep weight minimal, secure, and as close to the child’s core as possible to minimize impact on their balance.
Safe Storage Solutions for Young Scooter Riders:
- Mini Hydration Backpacks: Choose small, lightweight packs (e.g., 1.5-2 liters) designed for running or cycling. They sit snugly against the back and have sternum straps to prevent them from swinging.
- Low-Profile Handlebar Bags: Select small bags designed specifically to mount on a scooter’s handlebars. They are intended for very light items only (like a snack bar) to avoid affecting steering.
- Waist Packs (Fanny Packs): These are an excellent choice as they keep a minimal amount of weight centered at the body’s core, having the least possible effect on the rider’s overall center of gravity.
- Rule of Thumb: Absolutely no dangling items, plastic bags hanging from handlebars, or loose shoulder bags.
By enforcing a strict “hands on the bars, secure the cargo” policy, you eliminate a major source of instability and allow the child to focus solely on the task of riding.
Key Takeaways
- Dynamic balance, proven by a 3-5 second, stable glide on a 3-wheeler, is the single most reliable test for 2-wheel readiness.
- A skate-style helmet with extended occipital coverage is technically superior and safer for the multi-directional fall patterns common to scooters.
- Proper attire and a “no loose bags” policy are not mere suggestions; they are critical safety protocols to maintain the rider’s center of gravity and prevent entanglement.
Which Shoe Features Support Healthy Foot Development for First Walkers?
The final, critical point of contact between the rider and the vehicle is their footwear. The feet are not just for pushing off; they are complex sensory organs that provide constant proprioceptive feedback to the brain about balance, pressure, and the body’s position in space. The right shoes can enhance this feedback and provide a stable platform, while the wrong shoes can compromise it and introduce serious safety risks. For any scooter rider, but especially a young child still refining their motor control, footwear selection is a technical safety decision.
The ideal shoe for scooter riding has two primary features: a flat, grippy sole and a secure, closed-toe construction. A flat sole ensures maximum contact with the scooter deck, providing a stable base and clear feedback. A grippy texture, typically found on rubber-soled sneakers, prevents the feet from slipping, especially during the crucial acts of pushing off and braking. The closed-toe design is non-negotiable, as it protects the toes from impact with the ground, the front wheel, or obstacles.
Certain types of popular children’s footwear are dangerously unsuited for scooter riding. Sandals, flip-flops, and clogs like Crocs are particularly hazardous. They offer no toe protection, can easily slip off the foot, and their insecure fit makes it difficult to operate a rear foot brake effectively. The following table, adapted from a health and safety analysis of scooter riding, provides a clear safety rating for common shoe types.
| Shoe Type | Safety Rating | Key Features | Specific Risks |
|---|---|---|---|
| Rubber-soled sneakers | Excellent | Grippy flat sole, toe protection, ankle support | None |
| Skate shoes | Good | Flat sole, durable toe cap | May lack ankle support |
| Sandals/Flip-flops | Dangerous | Open design | No toe protection, can slip off, poor brake operation |
| Crocs/Clogs | Unsafe | Loose fit | Can slip off, inadequate foot security |
| Boots with heels | Unsafe | Elevated heel | Unstable platform, difficulty with foot brake |
Equipping your child with the right shoes is the final step in creating a complete system for safe riding. By addressing all the technical points in this guide—from dynamic balance assessment to helmet, wheel, and footwear selection—you can facilitate a successful and secure transition to the exciting world of two-wheel scooting.